Author Topic: Milwaukee Midget  (Read 3314372 times)

0 Members and 5 Guests are viewing this topic.

Offline Graham in Aus

  • Full Member
  • ***
  • Posts: 243
Re: Milwaukee Midget
« Reply #1365 on: August 26, 2012, 10:59:43 PM »
Hi Guys, been searching the net, I know theres a decent sorta '3D' ghost image of the oil system somewhere....

Chris it's kind of tough trying to visualise what you are showing, I have to say I hadn't considered the cross over of the two oilways like that before, I'm sure it would make sense with a block in front of me!

Purely from memory, the flow comes from the pump outlet, up and to the back of the pressure releif valve, excess pressure pushes the 'bullet' off the shuttle seat and the excess spills back till pressure equalises, I can't (at moment) visualise the other cross path, which I assume is flowing at right angles to the shuttle (via the narrowed bit?) down to the rear main? I agree, you would think the narrow bit would be equidistant in the drilling.....

Oh and I'd have no idea how to get in there to machine / relieve!  :?

I'll keep thinking....  
« Last Edit: August 26, 2012, 11:12:45 PM by Graham in Aus »

Offline Rob

  • Sr. Member
  • ****
  • Posts: 315
Re: Milwaukee Midget
« Reply #1366 on: August 26, 2012, 11:59:43 PM »
Not a ghost image but lots of lines and words  :-D

http://www.nonlintec.com/sprite/lubrication/

Offline Milwaukee Midget

  • Global Moderator
  • Hero Member
  • ***
  • Posts: 6663
    • Milwaukee Midget Racing
Re: Milwaukee Midget
« Reply #1367 on: August 27, 2012, 12:21:53 AM »

Oh and I'd have no idea how to get in there to machine / relieve!  :?

I'll keep thinking....  

I'll find out if it's a problem, first.  No sense in burning out the thinking cap just yet.  No doubt, it will be needed later.


"I think of it as an elegant solution to a problem that should never have existed."

That, right there, is I think part of the Pommy car mentality that traps you guys, or at least causes you to fall in love...... the million bolts, the weird measurements, the abject refusal to copy better ideas...... It leaves us who mess with the utilitarian, the commonplace, at a loss and those (you)who'd never stoop to those depths grinning to themselves......


It's a love one has that is akin to owning faithful 3 legged dog rescued from the pound, except you can't train a BMC engine to leak only on newspapers.

Rob, thanks for the link - it addresses the schematic, but unfortunately, not the blueprint.

Okay, for documentation purposes.

And by the way, these build diaries are a great way to catalog you measurements.  If you forget where you put your notes, you just log on, pull up the diary and use the search function.

As per Fordboy’s request – Crank straightness –


+.000 -.000 360 degrees.  Straight enough.

Bearing Crush – and I’m going to repeat this one this week after swapping a few things around, because it concerns me.
I lubed the studs, torqued down the caps and unscrewed one side, and checked the gap on the front and back of the cap with feeler gauges:
                                        Front         Back
Front cap                        .004         .003
Middle cap                     .004         .004
Rear cap                       .004         .002

Middle cap seems fine - .004 is what is required, but perhaps the front and rear caps have a taper?  Again, I hope this will go away by swapping a few bearings around.  That’s Monday’s work.

These numbers will likely change if I do swap the main bearings around, but Plastigauge on the mains got me:

Front         .003
Middle         .002
Rear         .003

Factory specs are .0010 - .0027, and I did take the crank in for a polish earlier this year.

So I’ll see what some futzing around might achieve.  I’m really rather disinclined to drag it back to the shop and go through the entire clean-up process again - but I will if I have to.
« Last Edit: August 27, 2012, 12:39:14 AM by Milwaukee Midget »
"Problems are almost always a sign of progress."  Harold Bettes
Well, I guess we're making a LOT of progress . . .  :roll:

Offline Rob

  • Sr. Member
  • ****
  • Posts: 315
Re: Milwaukee Midget
« Reply #1368 on: August 27, 2012, 12:54:34 AM »
I'll keep looking Chris,

I may well have it in the plthora of Leyland books here.

On another note andnot to hijack your thread, is plastigauge a reliable medium for a race engine?

I have been warned off useing it by a couple of local engine builders who insist that measuring the bearings installed in the torqued up rod/main cap and then doing the same with the crank journal followed by some math is th eonly reliable method?

Cheers,
Rob

Offline Milwaukee Midget

  • Global Moderator
  • Hero Member
  • ***
  • Posts: 6663
    • Milwaukee Midget Racing
Re: Milwaukee Midget
« Reply #1369 on: August 27, 2012, 09:18:21 AM »

On another note andnot to hijack your thread, is plastigauge a reliable medium for a race engine?

I have been warned off useing it by a couple of local engine builders who insist that measuring the bearings installed in the torqued up rod/main cap and then doing the same with the crank journal followed by some math is th eonly reliable method?

Cheers,
Rob

Clearly a better method - check it on three axis' is the method I've been taught.  I lack an inside mic, and seeing what's happening with my bearing crush, I've got some cpherin' and gozintas to do.

2 gozinta 4 2 times, 2 gozinta 6 3 times . . .
"Problems are almost always a sign of progress."  Harold Bettes
Well, I guess we're making a LOT of progress . . .  :roll:

Offline Milwaukee Midget

  • Global Moderator
  • Hero Member
  • ***
  • Posts: 6663
    • Milwaukee Midget Racing
Re: Milwaukee Midget
« Reply #1370 on: August 27, 2012, 06:34:36 PM »
Gat a call from Dema - the cam is done.

WOOT WOOT!  :cheers:
"Problems are almost always a sign of progress."  Harold Bettes
Well, I guess we're making a LOT of progress . . .  :roll:

Offline Captthundarr

  • Hero Member
  • *****
  • Posts: 1475
  • In line
Re: Milwaukee Midget
« Reply #1371 on: August 27, 2012, 11:02:04 PM »
Yeaaa, bumpy stick, bumpy stick.
Live,Laugh, Love /  Jack Scratch Racing /ECTA   
Amy Hartman-Driver, Frank Hartman-everthing else.
C/GALT 137.65 Ohio Mile check that 144.12 2013, AA/GALT 159.34 Ohio Mile 2014. B/GALT 180.577 RECORD 6/15

Offline 38flattie

  • Hero Member
  • *****
  • Posts: 2169
    • http://www.flatcadracing.org/
Re: Milwaukee Midget
« Reply #1372 on: August 27, 2012, 11:12:01 PM »
Gat a call from Dema - the cam is done.

WOOT WOOT!  :cheers:

 :cheers: :cheers: :cheers:
With sufficient thrust, pigs fly just fine. However, this is not necessarily a good idea. It is hard to be sure where they are going to land, and it could be dangerous sitting under them as they fly overhead. -- RFC 1925

You can't make a race horse out of a pig. But if you work hard enough at it you can make a mighty fast pig. - Bob Akin

http://www.flatcadracing.org/
http://youtu.be/89rVb497_4c

Offline Milwaukee Midget

  • Global Moderator
  • Hero Member
  • ***
  • Posts: 6663
    • Milwaukee Midget Racing
Re: Milwaukee Midget
« Reply #1373 on: August 27, 2012, 11:47:15 PM »
I agree –  :cheers:  :cheers:  :cheers:

Took a while - I'm certain it will have been worth the wait.

Key was coming up with a profile that didn't require notched pistons.  I'm fighting for every ounce of CR I can get.

The LCA's are spread out to 108 degrees - not quite as far as Vizard suggested, but it flips open faster than a switchblade in West Side Story.  Lift is up from the last cam - .350 total lift vs. .340 on the old cam, but it happens quicker - 252 @ .050 vs. 264 @ .050, and with less overlap.

Mr. Elgin was reluctant to grind it, but essentially we needed to size the cam to the constraints of the reciprocating assembly rather than modify the engine to work with the cam.  It's not uncharted waters, but I am keeping my eyes peeled for sea serpents.

A bit more backup documentation –

Crank End Float         .003
 
"Problems are almost always a sign of progress."  Harold Bettes
Well, I guess we're making a LOT of progress . . .  :roll:

Offline fordboy628

  • Hero Member
  • *****
  • Posts: 2342
  • GONE FISHIN' . . .
The Frankenstein Modifications
« Reply #1374 on: August 27, 2012, 11:55:57 PM »
Midget, et all,

Slightly behind the blog curve here, and I have several thoughts which I'm going to post separately, to keep my head from exploding.

On Midget's most recent foray beneath the 'Cheddar Curtain' we performed some block modifications (um, violations) on the stock BMC oiling system passages.  The stock system requires some modifications to perform reliably at extended/higher revs/minute.  Not necessarily in any order:

1   There should be some type of screen filter on the oil pickup pipe that extends into the sump.  It prevents the stray shard from being sucked into the pump.  Later model engines have a suitable screen filter/pickup pipe assembly that can be retrofitted to early engines using a bit of ingenuity.

2   You should be using the highest volume oil pump that will fit your cam drive/block combination.   Some pump types are inherently better than others in that they utilize a taller (thicker) lobe/rotor combo.  It should go without saying that the pump body casting & passages should be "ported"/smoothed.  The corner supports for the rotor, near the inlet & outlet passages, SHOULD NOT BE PORTED AWAY COMPLETELY!!   MISMATCHES BETWEEN BLOCK PASSAGES & OIL PUMP PASSAGES SHOULD BE CORRECTED WITH "PORTING".

3   The small diameter oil transfer pipe, (which exits the block above the starter) and connects to the oil filter housing, is in my opinion too small for racing engines.   In engines I have built up over the years, I have enlarged this pipe to an Aeroquip -8 or -10 line.  This also requires enlarging the block and oil filter housing fitting threads to a compatible/suitable size.   If you have to run a wet sump, and are allowed to run an "accumulator" (such as an "Accusump") plumb it in to this line.

4   I also enlarge the oil transfer passage from the filter housing to the main oil feed gallery.

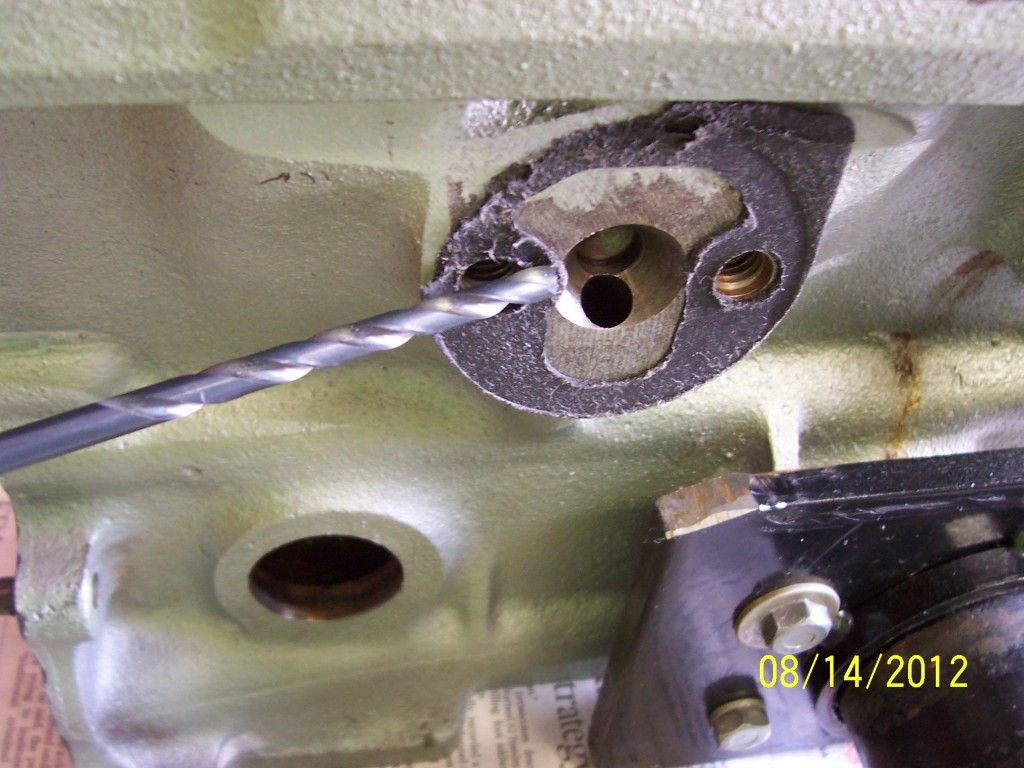
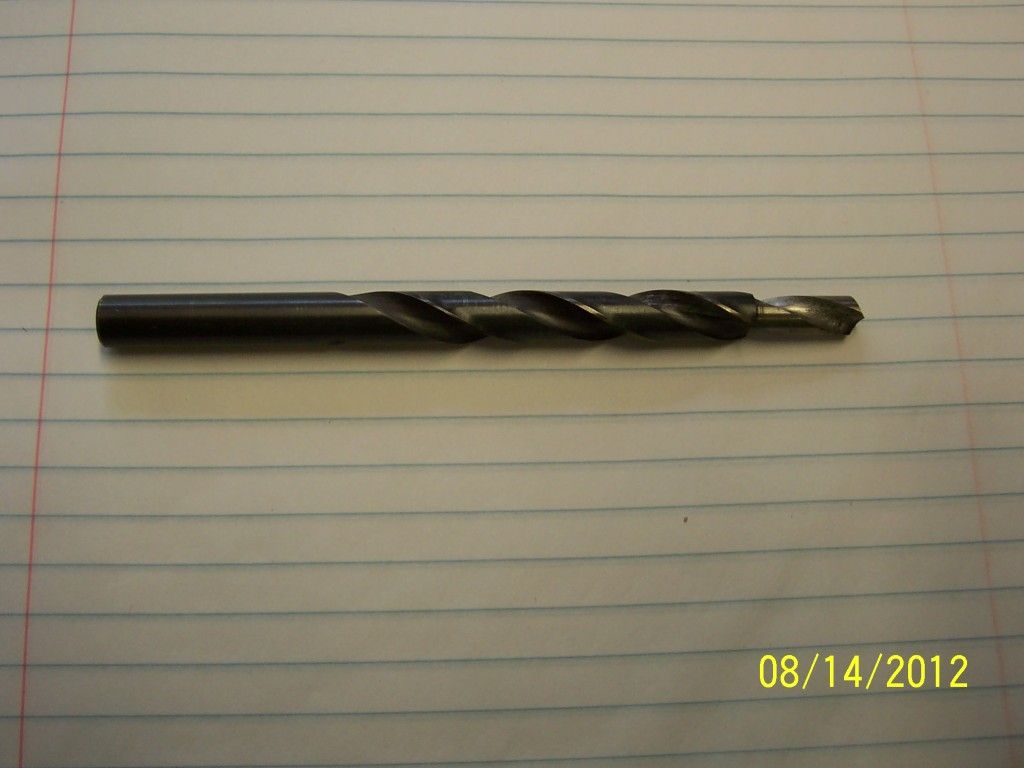
This passage starts out at 5/16" diameter.   This can be carefully enlarged to 3/8" diameter using a piloted jobbers length (longer than standard length) drill bit similar to the one pictured below.

A word of caution is required here.  The casting is "typically" thick enough in this area for this modification to be no problem.  
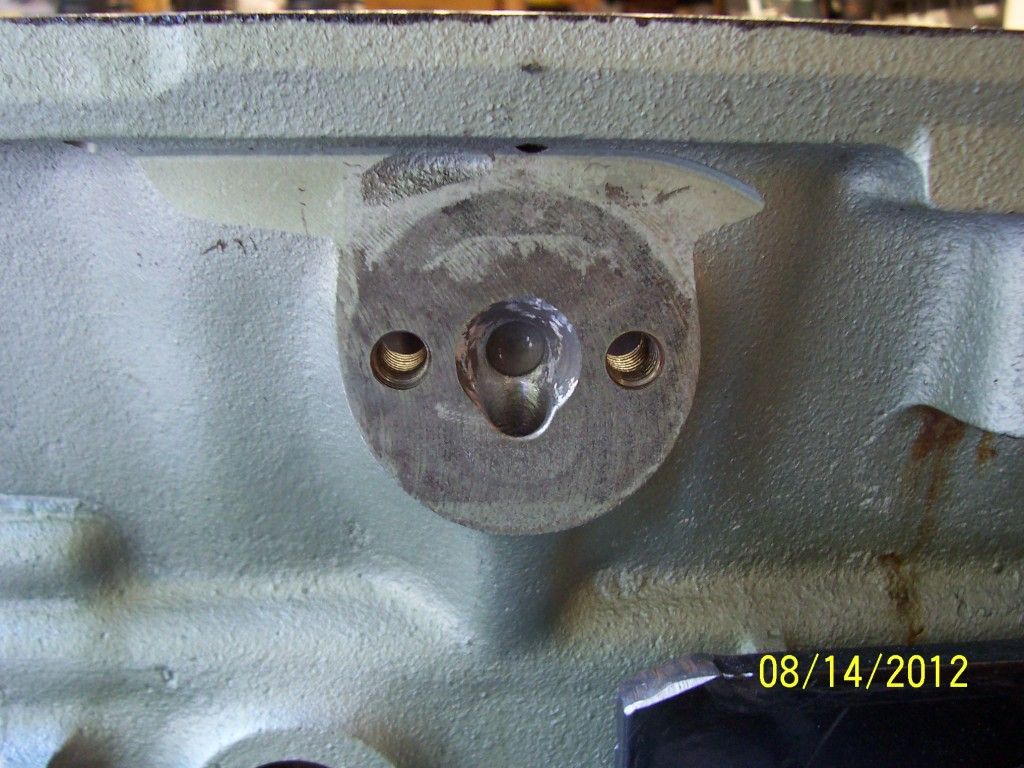
BUT, you must visually check beforehand!!!!  The drilling must be done with some kind piloted bit/cutter to follow the original drilling.  And you must stop drilling with the piloted drill when the pilot becomes visible in the main oil gallery.  The drilling can then be finished carefully with a long length, standard point drill bit.  As long as you stay centered on the original passage, you will intersect the main oil gallery.  It may not be perfectly centered on the main oil gallery, but you are looking to increase the cross-sectional area of that transfer passage coming from the oil filter housing.   I also "port" & smooth the entry to this passage on the block face as shown below.


5   The main oil gallery plugs (as well as the other oil system plugs) should be drilled/tapped for screw in plugs as suggested previously.  (See reply #1331, BMC Block Cleaning.)

6   I have had lots of problems with the oil feed holes in the #1 & #2main bearing saddles being mis-aligned with the oil feed hole in Vandervell VP2 racing bearings.  The problem exists because the oil feed passages for #'s 1&2 are 1/4" diameter, as opposed to #3 which is 5/16" diameter.

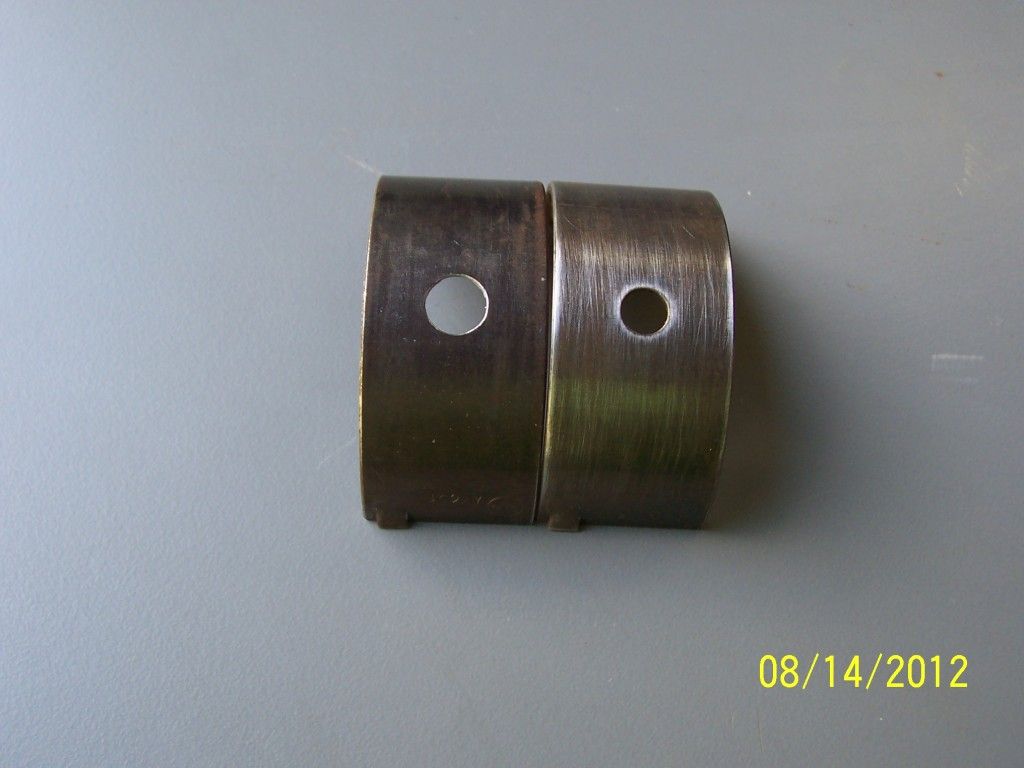
To solve this issue I utilize two methods.  Method 1 is to carefully enlarge the oil feed hole in the bearing with a tapered reamer.   This method can solve "slight" mis-alignment problems, as the feed hole cannot be enlarged too much.   See photo below.

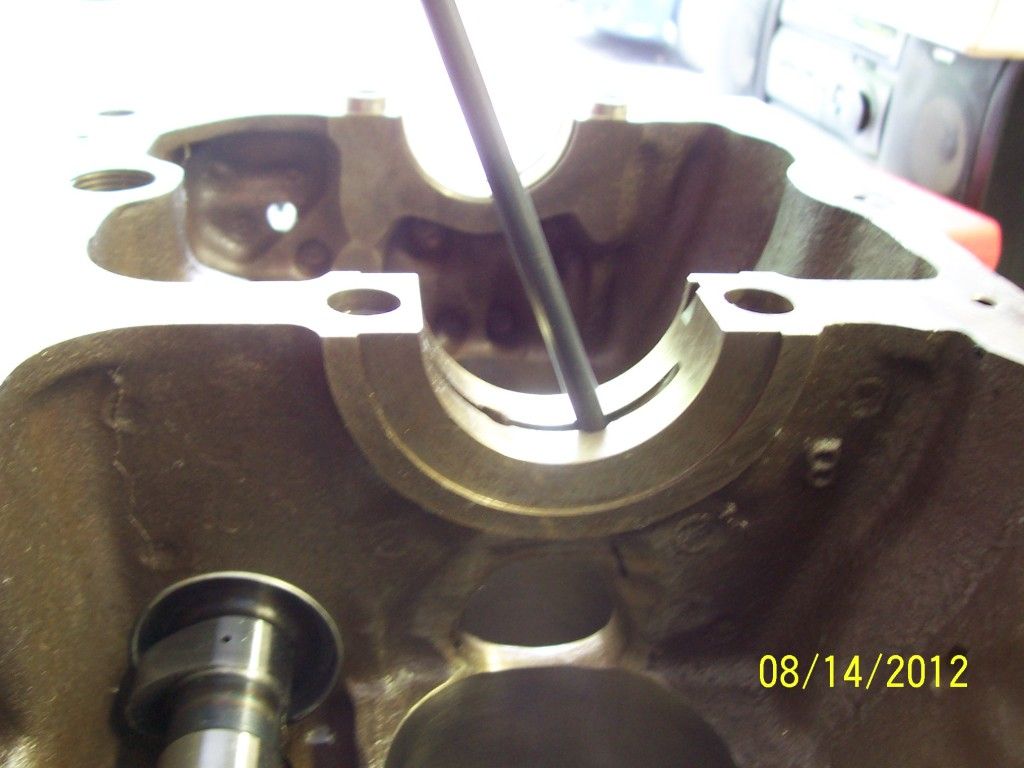
Most of the time though I have to use Method 2, which is to enlarge the oil feed passage in the block, about 1/4" deep, using a 5/16" drill with a 1/4" pilot ground on the nose as shown below.

Here is a photo of the proper modification.

And a photo of both #1 & #2 main saddles as modified.

Either method, or both methods combined, can be used to correct this common misalignment problem.

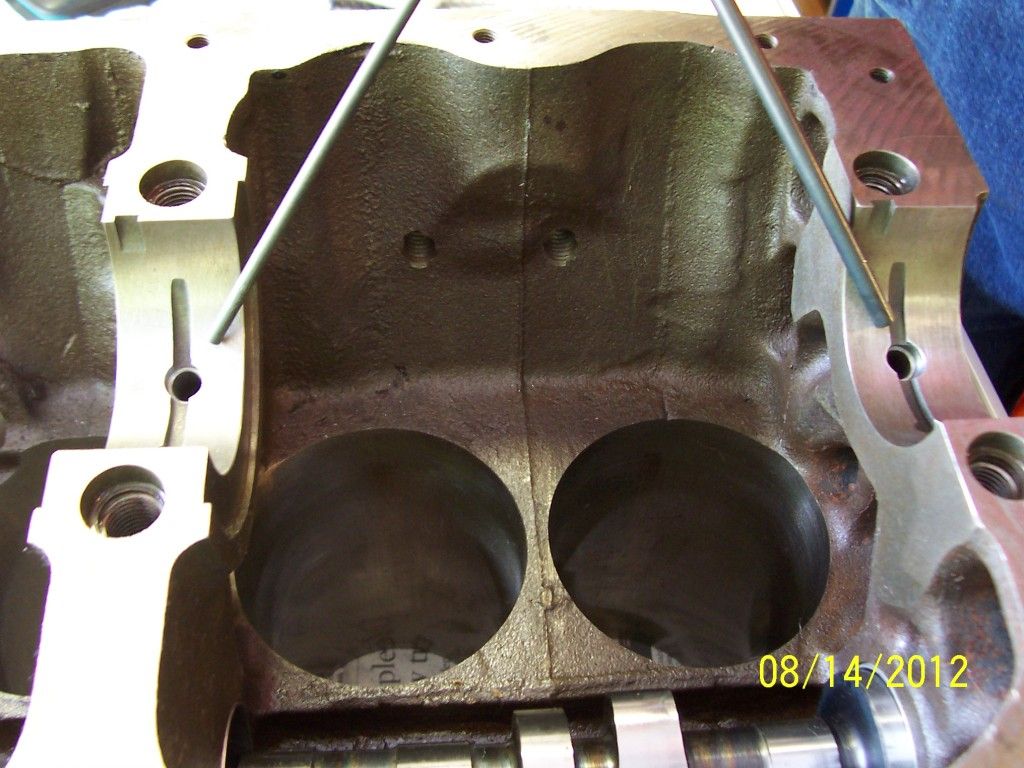
7   I have also had problems with bearing wear on the the #2 & #3 rod bearings.   I believe this is related to the fact that #1 main feeds #1 rod; #3 main feeds #4 rod; and #2 main feeds #2 & #3 rods.   As I noted before, the #2 main bearing oil feed passage, from the main oil gallery is only 1/4" diameter.   That is the same as the #1 main, which feeds only 1 rod.   The #3 main, still feeding only 1 rod, is 5/16" diameter.   I have had good sucess by enlarging the #2 main bearing oil feed passage from 1/4" diameter to 5/16" diameter, (for a significant, 55%, cross sectional area increase), BUT there is a caveat as shown below:

Notice that this passage passes very close to the "window", under #2 main, that exists in some blocks.   Additionally, some blocks, especially overbored ones, have boring reliefs (for honing) well below the bottom of the cylinder bores.   Study the photo, and then your block carefully, before drilling this passage.   A MISTAKE IN MEASUREMENT OR JUDGEMENT HERE TURNS YOUR BLOCK INTO JUNK!!!  There is a black marker line visible in the photo, just to the right of the "window".  I measure the thickness of the casting here very carefully.  I want to see a minimum of .56"/.63" here (measured longitudinally [fore & aft] in the bore relief area) before drilling this passage from 1/4" diameter to 5/16" diameter.  Chris has elected to leave his block at 1/4" diameter for this passage because his block is only .52" thick here.

Also of note: Some camshafts blanks have extra & overly large tappet and distributor drive gear oiling holes.   A restrictor may be required to prevent noteable oil pressure/volume loss in the system.  Another item to double check on.   I'll dig up and post some photos on this.

Schematic diagrams of the oil system can be found in Vizard's books:  Blue bible, page 352; Yellow pages, page 428.

That's it for now on the oil system.
 :cheers:
Son of Frankenstein

PS:  If you race a BMC, you need to think out of the box on the oiling system and the component parts.
 
« Last Edit: August 28, 2012, 01:11:05 AM by fordboy628 »
Science, NOT Magic . . . .

I used to be a people person.  But people changed that relationship.

"There is nothing permanent except change."    Heraclitus

"Only two things are infinite, the universe and human stupidity, and I'm not sure about the former."     Albert Einstein

Offline fordboy628

  • Hero Member
  • *****
  • Posts: 2342
  • GONE FISHIN' . . .
Re: Milwaukee Midget
« Reply #1375 on: August 28, 2012, 01:24:02 AM »
Fordboy, Graham,

Okay, putting the block back to rights.  I installed the center oil restrictor on the 2nd main with no difficulty, but the bypass spool has given me pause for thought.

It’s in, it’s bottomed against the machined ridge in the bore that leads to the pressure relief valve, but I don’t know if it’s supposed to be centered in the bore between the long gallery and the rear main.  It’s clearly not, and I’m not sure if this is the way it’s supposed to be, or if the block was improperly machined at the factory.

Using the bore scope and a .017 guitar string, looking up through the rear oil passage from the rear main bearing, note that the string cannot pass on the left side of the spindle –


Yet it passes through on the right side . . .


The ultimate question is, is there sufficient flow?


Midget,

The oil that passes through the center of the "spool" is only the bleed off from the pressure relief valve.   Flows here may be significant with cold oil on start-up, (so don't "blip" the throttle on a cold engine) and should be low when the oil is up to temperature and at high revs.  Have never had a flow problem because of this.

Not sure I would call this an "elegant" solution.   I agree that it should not have existed in the first place, but ultimately it is a packaging problem resulting from 5 pounds of bits in 3 pounds worth of space.   As I've said before, if you are going to race a BMC, you have to be prepared to make some compromises.   Like drinking warm beer from a "Lucas" refrigerator or inhaling through 1 nostril and exhaling through 1 and a half.

 :cheers: or whatever you say with the warm stuff........
Son of Frankenstein
« Last Edit: August 28, 2012, 01:37:35 AM by fordboy628 »
Science, NOT Magic . . . .

I used to be a people person.  But people changed that relationship.

"There is nothing permanent except change."    Heraclitus

"Only two things are infinite, the universe and human stupidity, and I'm not sure about the former."     Albert Einstein

Offline fordboy628

  • Hero Member
  • *****
  • Posts: 2342
  • GONE FISHIN' . . .
Re: Milwaukee Midget
« Reply #1376 on: August 28, 2012, 02:11:08 AM »

Oh and I'd have no idea how to get in there to machine / relieve!  :?

I'll keep thinking....   

I'll find out if it's a problem, first.  No sense in burning out the thinking cap just yet.  No doubt, it will be needed later.


"I think of it as an elegant solution to a problem that should never have existed."

That, right there, is I think part of the Pommy car mentality that traps you guys, or at least causes you to fall in love...... the million bolts, the weird measurements, the abject refusal to copy better ideas...... It leaves us who mess with the utilitarian, the commonplace, at a loss and those (you)who'd never stoop to those depths grinning to themselves......


It's a love one has that is akin to owning faithful 3 legged dog rescued from the pound, except you can't train a BMC engine to leak only on newspapers.

Rob, thanks for the link - it addresses the schematic, but unfortunately, not the blueprint.

Okay, for documentation purposes.

And by the way, these build diaries are a great way to catalog you measurements.  If you forget where you put your notes, you just log on, pull up the diary and use the search function.

As per Fordboy’s request – Crank straightness –


+.000 -.000 360 degrees.  Straight enough.

Bearing Crush – and I’m going to repeat this one this week after swapping a few things around, because it concerns me.
I lubed the studs, torqued down the caps and unscrewed one side, and checked the gap on the front and back of the cap with feeler gauges:
                                        Front         Back
Front cap                        .004         .003
Middle cap                     .004         .004
Rear cap                       .004         .002

Middle cap seems fine - .004 is what is required, but perhaps the front and rear caps have a taper?  Again, I hope this will go away by swapping a few bearings around.  That’s Monday’s work.

These numbers will likely change if I do swap the main bearings around, but Plastigauge on the mains got me:

Front         .003
Middle         .002
Rear         .003

Factory specs are .0010 - .0027, and I did take the crank in for a polish earlier this year.

So I’ll see what some futzing around might achieve.  I’m really rather disinclined to drag it back to the shop and go through the entire clean-up process again - but I will if I have to.


Midget,

I'm not exactly sure what you are measuring here using this method for bearing "crush".   I do not like methodology that introduces additional & undefined variables.   I normally use a dial bore gauge for this to check the id for the proper housing bore diameter with the cap torqued in place.   This method eliminates all the variables/subjectivity/feeler gages.  Either the bore is within spec or not.

Plastigage is OK for stock rebuilds if the stuff is of recent vintage.  As in new.  The manufacturer of Plastigage says old product hardens with age and becomes unreliable.   I use a bearing bore gage OR an inside mike OR a snap gage and a outside mike.

.003" crank end float is OK.  It's not going to get any smaller........

Was the dog perchance named "Lucky"??  Perhaps a childhood pet??  Were you ever run over by an MGB as a child??  Repeatedly??

Have gun, will travel.  Er, have all the measuring tools and am willing to risk the "Cheddar Curtain" gauntlet.  Tueday/Wednesday best for me.  Need to be assured Paul Ryan will be out of state.
 :cheers:
Palladin
Science, NOT Magic . . . .

I used to be a people person.  But people changed that relationship.

"There is nothing permanent except change."    Heraclitus

"Only two things are infinite, the universe and human stupidity, and I'm not sure about the former."     Albert Einstein

Offline Milwaukee Midget

  • Global Moderator
  • Hero Member
  • ***
  • Posts: 6663
    • Milwaukee Midget Racing
Re: Milwaukee Midget
« Reply #1377 on: August 30, 2012, 01:26:11 AM »
Busy couple of days.

Parts are showing up, as did Dr. Fordboy for his house call on the Frankenblock last night.

The patient is doing fine, thankyouverymuch.  I, on the other hand, just managed to get to work on time.
  
The house call led to another tutorial, some good tips, some accurate measurements and tacos and Smithwicks at McBob’s, where we saw a semi take out a light pole right in front of the police station.  I love this town.

FB very accurately measured up the main crank bearing housing, and after all was said and done, the numbers confirmed what I had come up with using plastigauge, so that’s what I used tonight to check the rod clearances.

1   .0027
2   .0030
3   .0028
4   .0028

Pistons, rods, crank – in, torqued and measurements cataloged.  Gaskets are due Friday, cam, probably next Tuesday.  Dema’s doing a printout, and we’ll confirm it with the archives FB has constructed and some more measurements.

Also got a call from Dave at Streets Chassis – The new front crossmember is in, the net is in, and I’ve got a piece of ¼” steel he’s going to weld in under the seat to prevent a colonoscopy by anything that’s likely to fall off the bottom of the car and bounce up through the floorboard.  It’s an MG – that could be just about anything.

He had the work done two weeks ago, but it seems he took a westward swing out to Utah.  I can’t imagine what he was up to . . .

Next few days, I’ll be putting together a checklist and a schedule, culminating in dyno time on the 26th of September.  If it falls together and the results are encouraging, I’ll be rolling out to World Finals on the 30th.  If not, I get to play Cubs fan again – There’s always next year.
« Last Edit: August 30, 2012, 10:30:55 AM by Milwaukee Midget »
"Problems are almost always a sign of progress."  Harold Bettes
Well, I guess we're making a LOT of progress . . .  :roll:

Offline wisdonm

  • Full Member
  • ***
  • Posts: 125
Re: Milwaukee Midget
« Reply #1378 on: August 30, 2012, 01:57:40 AM »
Ah, McBobs. Wife made corned beef on Sunday. I had judged a BBQ contest last Sat. in Kenosha and this Sat. in Warrens. It's a tough job, but someone has to do it. I skipped judging two weeks ago at Grafton to go to the University Motors Party, MG Vintage Racers, Vintage Sports Car Drivers Association, and MG-B 50th Anniversary event in Grattan, MI. Dick won the All English races both Sat. and Sun. He also was the first 4 cylinder to win the V-8 Challenge Trophy.

We got to do McBobs together sometime.
Stand on it....brakes only slow you down.

Has a checkered past.

Offline Milwaukee Midget

  • Global Moderator
  • Hero Member
  • ***
  • Posts: 6663
    • Milwaukee Midget Racing
Re: Milwaukee Midget
« Reply #1379 on: August 30, 2012, 02:06:32 AM »
He also was the first 4 cylinder to win the V-8 Challenge Trophy.

We got to do McBobs together sometime.

Often outgunned, but never outclassed - Dick's a hero!

David Stuursma, the editor at Moss Motoring was there.  I imagine it was quite an event - just couldn't get away.

Close to my place, McBob's is.  Don, let's shoot for that before I head out to Utah.  Give you a chance to get a good laugh and eye-roll at the Midget.
"Problems are almost always a sign of progress."  Harold Bettes
Well, I guess we're making a LOT of progress . . .  :roll: