Author Topic: Any experienced TIG alu-welders out there ?  (Read 32082 times)

0 Members and 1 Guest are viewing this topic.

Offline Seldom Seen Slim

  • Nancy and me and the pit bike
  • Administrator
  • Hero Member
  • ***
  • Posts: 13165
  • Nancy -- 201.913 mph record on a production ZX15!
    • Nancy and Jon's personal website.
Re: Any experienced TIG alu-welders out there ?
« Reply #15 on: March 14, 2010, 01:58:27 PM »
Mike:

Thanks for the offer, but I don't have spare wheels -- so I'd be without the truck for the duration of the job.  And where do you suggest I get the aluminum tabs?  I'm pretty sure Moon doesn't sell them (although I haven't looked and now will do so).

Sunny and 55F here in Michigan's Upper Peninsula.
Jon E. Wennerberg
 a/k/a Seldom Seen Slim
 Skandia, Michigan
 (that's way up north)
2 Club member x2
Owner of landracing.com

Offline Stan Back

  • Hero Member
  • *****
  • Posts: 5885
Re: Any experienced TIG alu-welders out there ?
« Reply #16 on: March 14, 2010, 02:23:11 PM »
Seems to me you could pop-rivet a steel Dzus base onto an aluminum bracket which could be welded to the wheel.  I ain't done it, tho.
Past (Only) Member of the San Berdoo Roadsters -- "California's Most-Exclusive Roadster Club" -- 19 Years of Bonneville and/or El Mirage Street Roadster Records

Offline octane

  • Sr. Member
  • ****
  • Posts: 527
  • Nimbus 750 APS-VBF
Re: Any experienced TIG alu-welders out there ?
« Reply #17 on: March 14, 2010, 03:17:52 PM »
Thank you very much all of you for taking the time to help me here !

I'd like to comment a few of the posts and ask a few silly questions.
( To those whose post I do not comment: it's not that I'm not listening to your good advise,
and again: thanks for helping me here )

The transition from welding steel to aluminum is like going from drag racing to LSR. Kinda the same, but way different.
Well, in my case , never having really mastered any welding technique,
is more like going from riding a bicycle to racing for a LSR
.-)

Quote
First thing to do is turn off that fan in the picture. It blows the shielding gas off the weld. Real welders just sweat.
Got'ya!...I only put it there as I was warned about the harmful fumes from the welding in general
and the radioactive electrode in particular.
BWT being new to this stuff, the first night I didn't pay attention to the fact that my shirt wasn't
buttoned up all the way.
I did next morning..didn't I !
I now have a glowing red triangle right where the shirt was open.

Quote
When you weld steel you clean off the rust first. Rust is the inevitable reaction of oxygen with the steel. It happens over time. Chemically it isn't far from the base steel.
Aluminum does the same thing. The "rust" is aluminum oxide and it forms instantly when you make a cut. It is very different from the base metal. In the crystalline form it's called Corundum and is used as an abrasive. Super hard and it is the primary cause of your difficulty.

Cleanliness of the surface as noted is critical. Any oil or junk makes it worse.

The aluminum sheds heat faster than you think. The amount of heat needed is way more than your steel calibrated head is ready to believe.

The appearance on the surface doesn't tell you enough when you are learning.
Got'ya !

 
Quote
Cut the weld on a band saw and see how far your weld penetration is going.
Brilliant. I'll do that

Quote
Practice, practice, practice.
Yes, yes, yes

.-)
« Last Edit: March 14, 2010, 04:16:03 PM by octane »
"A designer knows he has achieved perfection
not when there is nothing left to add
but when there is nothing left to take away"

Antoine de Saint-Exupery

Offline octane

  • Sr. Member
  • ****
  • Posts: 527
  • Nimbus 750 APS-VBF
Re: Any experienced TIG alu-welders out there ?
« Reply #18 on: March 14, 2010, 03:40:14 PM »
Tig, otherwise known as GTAW (gas tungsten arc welding), on aluminum can be a challenge. You should familiar with the basic setup which includes argon shield gas at a flow rate of around 15-20 cfh, a pure tungsten electrode, and AC current.

OK,
..got the argon currently set at a flow rate of 9 liters/hour which is what I was advised to set it at
( That's around 0.3 cubic feet ...erh...something's wrong here .
[EDIT : ] Wait a minute ; must be 0.3cf/minute = ( 0.3 x 60= ) 18 cfh)
...got the pure tungsten electrode ( the radioactive type, marked red )
...got the ac (/dc) current

Quote
The next item is weldability of the alloy. 2XXX & 7XXX series alloys can be almost impossible to weld with any equipment you or I can afford. 3XXX, 5XXX, and 6XXX series are more easily welded, especially the 4XXX.
Don't really know about the alu I'm practicing on, except it's from a place I cooperate with
and I've been out there with my welding equipment and spend some time with the welder in charge
who helped me and gave me advise.

 
Quote
Cleanliness is vital. Remove all dirt, oils, corrosion, etc. Clean the area with a stainless steel wire brush that is used ONLY for aluminum to prevent cross contamination.
Depending on the capabilities of your power source and the thickness of your material, significant preheat may be needed. Aluminum has a high thermal conductivity so the heat you put into the are you are trying to weld quickly flows into the surrounding material. If the items are small enough you can put them in an oven and bring them to about 200 F.
At some point, probably sooner than later, you will experience weld solidification cracking. This is extremely common when attempting welds in 6061 without filler. Using a 4043 filler will help prevent this...
Dunno what 4043 means. This is the type of filler I use.


I do have other types for welding stainless steel and metal ( haven't tried it yet )


I do know that it works well on the alu I use, as I saw the above mentioned welder
using my equipment and filler, when he showed me how to set up a good weld.


Quote
From the looks of your practice welds I would say you are coming along fine.
Thank you!


Quote
It just takes lots and lots of practice. If you can find an experienced welder in your area to spend a couple hours with you they can save you many hours of frustration and lots of spent consumables and filler.
I did spend time with a friend who does excellent "small" stuff, like thin alu-sheet welding
and the above mentioned guy who does "big" stuff like alu-construction work.
But in a way it's like asking a guy "How does one ride a bicycle" ?
One can watch but:
Practice.


Quote
Check out Lincolns web site for some good info on welding aluminum.
http://www.lincolnelectric.com/knowledge/askus/weldingfaqs.asp
Thanks. Will do !
« Last Edit: March 14, 2010, 04:15:18 PM by octane »
"A designer knows he has achieved perfection
not when there is nothing left to add
but when there is nothing left to take away"

Antoine de Saint-Exupery

Offline octane

  • Sr. Member
  • ****
  • Posts: 527
  • Nimbus 750 APS-VBF
Re: Any experienced TIG alu-welders out there ?
« Reply #19 on: March 14, 2010, 03:44:47 PM »
Would anyone like to add a comment concerning the shape of the tip of the electrode Steel vs. Aluminum and how to form that shape ?

For steel the tip should be ground to a taper, usually with a slightly truncated (blunted) end. The angle varies but generally speaking as the included angle increases the weld penetration increases and the bead width decreases so a flat ended electrode will give the deepest penetration and a needle-like point the least. I know it sounds counterintuitive, but it is in the way the electrons flow off the tungsten. Somewhere around a 45-60 degree included angle is a good starting place. Grinding should be done so the grind marks run towards the point, not perpendicular to it.
Ahhh, my friend told me that, but he was refering to alu-welding , where as the other guy who does
"big" alu constructions told me not to taper when welding alu,
and none of them told me about the trick you mention below,
about ball'ing it.

Thanks. I'll try that!

Quote
For aluminum the tungsten can should be balled by striking and arc on a piece of clean copper using DCEP current and a flat-end electrode. Increase current until the tungsten begins to melt and forms a ball no more than 1.5 times electrode diameter. I have used a piece of stainless in place of copper as well as a thick chunk of very clean aluminum. Don't forget to change back to AC after balling the tungsten. (I've never done that.  :roll:)
"A designer knows he has achieved perfection
not when there is nothing left to add
but when there is nothing left to take away"

Antoine de Saint-Exupery

Offline octane

  • Sr. Member
  • ****
  • Posts: 527
  • Nimbus 750 APS-VBF
Re: Any experienced TIG alu-welders out there ?
« Reply #20 on: March 14, 2010, 03:50:56 PM »
first how thick are you trying to weld? 
For now I'm doing 3-4-5 milimeters.
basically I want to be able to fabricate brackets etc. for my bike.

Quote
on my roadster the seat and the hood and other (big stuff) is 90 alu. I ball the electrode . but when I weld 50 alu I make the  electrode sharp which makes the bead smaller.  are you having a back crack at the end of the welds? (please no butt crack jokes)  at the end of your pass slowly let off the heat. now if you are making shaped body panels I weld the back side of the pass, just by flowing it together. Just a few tips from 20 years of metal shaping good luck.  www.millerwelds.com (bonneville in the search box)
Good advise. Thanks.

I'm not sure what "ball cracks" are but if it's something similar to something that resembles a buth*le;
then, Yes!

.-)
"A designer knows he has achieved perfection
not when there is nothing left to add
but when there is nothing left to take away"

Antoine de Saint-Exupery

Offline octane

  • Sr. Member
  • ****
  • Posts: 527
  • Nimbus 750 APS-VBF
Re: Any experienced TIG alu-welders out there ?
« Reply #21 on: March 14, 2010, 04:06:01 PM »
Would anyone like to add a comment concerning the shape of the tip of the electrode Steel vs. Aluminum and how to form that shape ?

I use an import inverter setup much like the one that you have, and have found that 2% Thoriated tungsten ground the same as for steel works very well. There is something a little different between the inverters and the old copper wound welders that makes this work. I find that with pure tungsten on the inverter the tip tends to melt and erode way too fast when welding aluminum, and will contaminate the weld.

I've only been TIG welding a short time myself, and can share a few things that seemed to work for me as far as getting started.

Make sure that your using an appropriate size electrode. The diameter of the electrode should be close to the thickness of the material that your welding. Using a large electrode on thin material is a recipe for disaster in my experience.

On getting your puddle started on both pieces, I find it best to have no space between the parts I'm joining. When starting your puddle, especially on thin material (less than .100") pick a spot a little ways in from the end of the joint to begin the weld so that the corners don't melt away and fall off. (Once the weld is started you can go back and finish it to the edge.) Put as much heat into it as you can as quickly as you can while still leaving yourself a little pedal to work with to get the puddle started. Watch the area closely, you will see the "texture" start to change in the area you are heating before it actually melts, if one side melts and the other isn't really close move your torch slightly to concentrate more heat on the side that isn't melting. Once one side is molten and the other is really close, simultaneously add a dab of filler rod and mash the pedal for a second to get extra heat to melt the filler to both sides and create the weld pool. This is one of the most critical parts to me, because in order to insure good penetration you must have full contact with the pool with both pieces that you are joining, but you have to develop the feel for it to not burn through. (Does that make any sense :?) When I was starting I burned through a lot, and practiced till I was able to pretty much keep it right on the edge of burning through for full penetration. If you don't go over the edge a few times, you'll never really know exactly where it is.  :evil:

Once you have a pool started, it's a relatively easy matter to run the bead. I like to pulse the pedal, add a dab of filler, let off the pedal, then move a little and repeat. Just watch the pool carefully and add filler when the edges start to melt back. As your weld progresses the aluminum absorbs heat and it takes less amperage to continue the weld, keep an eye on this also and slowly back off on the pedal to maintain an even bead width. If you keep welding at the same amperage it took to start the bead, you will eventually blow a hole in it.

Ending the bead is another tough spot. I find it best to taper off the amps and slow my weld speed when I'm getting to the end of the weld. When I put my last spot of filler in I'll give a little extra pulse to the pedal and then let off completely and pull the torch away slowly in the direction of travel, rotating the head to keep the post flow gas on the weld as the machine ramps down. I find that this move helps to minimize pitting at the end of the bead.

Everything that was said above about cleanliness is spot on, don't get tempted to try to bypass any of it, it will not be good. In fact, if you've cleaned your metal, and have to leave it for some reason for more than an hour or so, clean it again before trying to weld, wire brush and all. Bare clean aluminum starts oxidizing instantly. I know you machine parts, just think how dull that beautiful shiny freshly machined surface looks 1/2 hour after you're done.

IMPORTANT SAFETY WARNING>
Use ONLY acetone or alcohol to clean the metal. DO NOT use brake cleaners or other shop chemicals ever, as they may have nasty reactions with heat and atmosphere and try to kill you. Make sure that whatever you use to clean is completely evaporated and the container is well away from the welding area before striking an arc so that you don't end up on fire.

The main thing is to practice, practice, practice. When you think it looks good, cut it and look inside the weld. Bend the parts you've welded and then cut them to see how they hold together, and make sure you're comfortable with it.

I always viewed welding as an evil necessity until I started TIG welding. Now it's my Zen place and something that I absolutely love to do. The total control and concentration needed to do good work drives everything else from my mind like nothing else I've ever found. It's better than recreational medication, LOL.

Another thing that I highly recommend is to get a water cooled torch if you're planning on doing a lot of aluminum. It takes a lot of amps and the torch can get very hot in the hand quickly. It really sucks having to stop in the middle of a good bead because your torch is about to melt in your hand. I bought a water cooled torch for about $150 and built my own cooler from a 5 gallon plastic bucket, a small pond pump, and some fittings from the welding supply shop for less than $100. It makes all the difference in the world and is the best thing since sliced bread in shirt pockets.  :-P

It looks like your off to a good start, and I hope some of what I've put up here helps. Like I said at the start, this is what works for me, your mileage may vary and it seems that everyone develops their own style and technique over time. Just remember to relax and enjoy it and have fun.   :cheers:

Thank you Whizz, for this great amount of good advise !!! Absolutely brilliant.
Yes, it does help.
I'll try to digest it tomorrow when I've picked up a new bottle of argon
and I'm back to welding again.

A couple of observations:
Yes you're right; when doing this stuff the surrounding world disappears
as one is so totally focused and concentrated.
I don't even think about unpaid back-taxes
.-)

It's really a great feeling and I thoroughly enjoy trying to learn a new skill.
Learning is humbling and invigoration at the same time.

One point I don't quite get:
Quote
The diameter of the electrode should be close to the thickness of the material that your welding...
That would require one giant electrode to weld the 6mm (1/4 inch) construction alu
they weld at the place I mentioned above.


Again: thank you kindly all, for taking your time to share your experience
to help me here !!!!!!!!
"A designer knows he has achieved perfection
not when there is nothing left to add
but when there is nothing left to take away"

Antoine de Saint-Exupery

Offline Gwillard

  • Full Member
  • ***
  • Posts: 238
Re: Any experienced TIG alu-welders out there ?
« Reply #22 on: March 14, 2010, 04:40:22 PM »
Ok, a couple of things I noticed. The first is your tungsten identification. The red tungsten is actually 2% Thoriated. The thorium is slightly radioactive, but unless you are using it 12 hours a day the radiation level is insignificant. It is used for welding with DC current on steel, the thorium enhancing arc initiation and stabilization. What you want to use for aluminum is the green since you unit most likely has a high frequency arc stabilization built in.
The second thing is the filler rod. It is marked "AlMg5", which we can assume is 5356. 4043 has far less magnesium than that, being alloyed primarily with silocon. 5356 and 4043 are the two most popular fillers for aluminum. 4043 has the widest range of use, but 5356 is the one to use if the parts are to be anodized after welding.
Now quit reading this and get back to practice!  :-D
Will weld for beer :cheers:

Offline Cajun Kid

  • Rajun Cajun Racing E/CGALT 5690
  • Hero Member
  • *****
  • Posts: 3189
  • Venable Rod's & Racing #805 Studebaker, #806 Ford
Re: Any experienced TIG alu-welders out there ?
« Reply #23 on: March 14, 2010, 04:59:01 PM »
SSS,

Get some .090 .o .100  Alum and make new Dzus tabs.. then you can weld TIG weld them to the new trucks alum wheels,,, you may need a little longe Dzus button...

See you in April...

PS... the Moon hub cap style...snap on ones.. look like crap and fly off too..  :cheers:

Charles
ECTA Record Holder Maxton
E/CBFALT, E/CBGALT, E/CGALT, E/CFALT, A/CGALT, C/CGALT, D/CGALT, C/CBGALT, B/CBGALT, C/CFALT
OHIO
B/CGALT, C/CGALT

LTA Record Holder and 200 Club Member
A/CBFALT, B/CBFALT, C/CBFALT, C/CFALT, C/CGALT,   E/CGALT, E/CFALT

Fastest Standing Mile at Ohio  203.343mph
Fastest Standing Mile at Maxton 196.967mph
Fastest Standing 1.5 Mile at Loring 213.624mph
Fastest Standing Mile at Loring 204.109mph

http://s261.photobucket.com/albums/ii43/cajunkid5690/

Blog    www.venablerodsandracing.com
email   venableracing@gmail.com

Offline octane

  • Sr. Member
  • ****
  • Posts: 527
  • Nimbus 750 APS-VBF
Re: Any experienced TIG alu-welders out there ?
« Reply #24 on: March 14, 2010, 05:07:31 PM »
Ok, a couple of things I noticed. The first is your tungsten identification. The red tungsten is actually 2% Thoriated. The thorium is slightly radioactive, but unless you are using it 12 hours a day the radiation level is insignificant. It is used for welding with DC current on steel, the thorium enhancing arc initiation and stabilization. What you want to use for aluminum is the green since you unit most likely has a high frequency arc stabilization built in.
The second thing is the filler rod. It is marked "AlMg5", which we can assume is 5356. 4043 has far less magnesium than that, being alloyed primarily with silocon. 5356 and 4043 are the two most popular fillers for aluminum. 4043 has the widest range of use, but 5356 is the one to use if the parts are to be anodized after welding.
Now quit reading this and get back to practice!  :-D

I'm not reading this and I'm not responding to this p..............................
"A designer knows he has achieved perfection
not when there is nothing left to add
but when there is nothing left to take away"

Antoine de Saint-Exupery

Offline octane

  • Sr. Member
  • ****
  • Posts: 527
  • Nimbus 750 APS-VBF
Re: Any experienced TIG alu-welders out there ?
« Reply #25 on: March 14, 2010, 05:28:33 PM »

... What you want to use for aluminum is the green
Yep, that's what my friend who does the "fine" alu welding told me,
but the guy at the welding exuipment sales place told me to use the 'red' one.
Confused.

 
Quote
since you unit most likely has a high frequency arc stabilization built in.
Dunno.
Does it ?


Still more than slightly confused about the knobs here,
as the instructions that came with the equipment are ridiculously hard to understand.
Some drug-induced weird translation from Chines to English, and it seams that
there a no common way that the manufacturers use for describing the functions on the welding equipment.


Quote
The second thing is the filler rod. It is marked "AlMg5", which we can assume is 5356. 4043 has far less magnesium than that, being alloyed primarily with silocon. 5356 and 4043 are the two most popular fillers for aluminum. 4043 has the widest range of use, but 5356 is the one to use if the parts are to be anodized after welding. ...
Mmmmmm: I'm going to get a new bottle of argon tomorrow so I ask for some 4043 and see how it works.
Any drawback in using 5356 ?

Thank you for your patience with this here newbie !!!!!
Much appriciated.
"A designer knows he has achieved perfection
not when there is nothing left to add
but when there is nothing left to take away"

Antoine de Saint-Exupery

Offline Gwillard

  • Full Member
  • ***
  • Posts: 238
Re: Any experienced TIG alu-welders out there ?
« Reply #26 on: March 14, 2010, 05:52:08 PM »
I didn't notice a high freq switch on your control panel, but I'm pretty sure it has the high freq built in. Most new machines do, esp. the inverter units.
5356 gives slightly less penetration than 4043 due to it's higher melting temperature. Other than that it has not issues.
4043 gives a bit better penetration, welds a tad easier, and gives a little bit stronger weld in the popular 6xxxx aluminums, such as the evr popular 6061, but isn't recommended for high magnesium content (5xxx series) aluminums and it looks like crap when anodized.
Another thing to remember when welding aluminum: If the base metal is hardened either by heat treatment (precipitation hardening) or strain hardening, the hardening will be lost in the weld area and the only way to return it is to reharden the entire piece.
Will weld for beer :cheers:

Offline 4-barrel Mike

  • Hero Member
  • *****
  • Posts: 3173
  • Any fool can drive a V8
Re: Any experienced TIG alu-welders out there ?
« Reply #27 on: March 14, 2010, 06:37:00 PM »
As long as we're hijacking -- I'm not a welder (nor much of anything else, but that's another story).  So - my new '09 GMC pickup has factory aluminum 17" wheels.  No steel wheels are available, either OEM or aftermarket.  So if I want to mount Moon discs I either have to try the snap-in style (with which I've not had great luck - lost a few over the miles) or figure out who'll weld the steel Dzus button tabs to the aluminum wheels.

Any comments on how to get the tabs to stay put well enough that the things don't get bounced and flung off in the next 50,000 miles?

Oh, yeah -- I've tried the screw-on type, with drilled/tapped holes in the rim, and there was enough corrosion that the discs didn't stay on and the rims looked pretty crappy after only a few months.  I'd rather the tabs/Dzus style.

Pete Richardson put moon discs onto his aluminum wheels, so I emailed him:

Are you running the discs over your aluminum wheels?  If so, how did you attach the dzus fastener tabs??

Yes . I got tabs from Huff  wheels and had them weilded on the aluminum wheels . I`m in Mex,. I can verify all when I get back the 1st part of April
 
Later Pete


I suspect Huff Wheels has nothing to do with VW's (Google'd), but is probably:

Ken Huff Racing Wheels — Land Speed Record racing wheels
10827 Larrylyn Drive
Whittier, CA 90603
(310) 943-6877

Mike

Now, back to our regularly scheduled thread.   :mrgreen:
Mike Kelly - PROUD owner of the V4F that powered the #1931 VGC to a 82.803 mph record in 2008!

Offline WhizzbangK.C.

  • Full Member
  • ***
  • Posts: 227
  • Ed Bennett, Speed Team Doo Kansas City fab shop.
Re: Any experienced TIG alu-welders out there ?
« Reply #28 on: March 14, 2010, 06:38:30 PM »

... What you want to use for aluminum is the green
Yep, that's what my friend who does the "fine" alu welding told me,
but the guy at the welding exuipment sales place told me to use the 'red' one.
Confused.

 
Quote
since you unit most likely has a high frequency arc stabilization built in.
Dunno.
Does it ?


Still more than slightly confused about the knobs here,
as the instructions that came with the equipment are ridiculously hard to understand.
Some drug-induced weird translation from Chines to English, and it seams that
there a no common way that the manufacturers use for describing the functions on the welding equipment.


Quote
The second thing is the filler rod. It is marked "AlMg5", which we can assume is 5356. 4043 has far less magnesium than that, being alloyed primarily with silocon. 5356 and 4043 are the two most popular fillers for aluminum. 4043 has the widest range of use, but 5356 is the one to use if the parts are to be anodized after welding. ...
Mmmmmm: I'm going to get a new bottle of argon tomorrow so I ask for some 4043 and see how it works.
Any drawback in using 5356 ?

Thank you for your patience with this here newbie !!!!!
Much appriciated.

OK, a clarification of a couple of things. The basic rule on tungsten diameter that I go by is not to weld with an electrode much larger than the thickness of the material that I'm welding. I generally use 1/16, 3/32, and 1/8 electrodes. I will weld up to 5/16 thick material from time to time with the 1/8 electrode, using multiple passes. Just don't try to weld .040 material with a 1/8 electrode as you will fight blowing holes in it.

Yes, your welder has high frequency. In DC mode is only works to start the arc, in AC mode it is on full time. It is an automatic feature of the machine and doesn't have a separate switch.

As far as what type of tungsten to use, with older machines if you were welding aluminum you needed to use pure tungsten (green end). With the newer inverter based machines that has changed. You can still use the pure, but the thoriated will keep a point on it welding AC with an inverter machine and allow you better control of where your arc is hitting the work. The square wave effect of the inverter machine makes this possible. With the traditional sine wave of the old machines thoriated would blow apart if you tried to use it with AC. I only use thoriated now, on everything I weld, and it works great. Makes buying supplies easier too. Most welders who learned the trade before inverter machines became common would not dream of using anything but green on aluminum, but technology sometimes changes things. :-D

My machine is similar to yours, but doesn't have all the adjustments that you have. Maybe I can explain some of them a little bit to help.

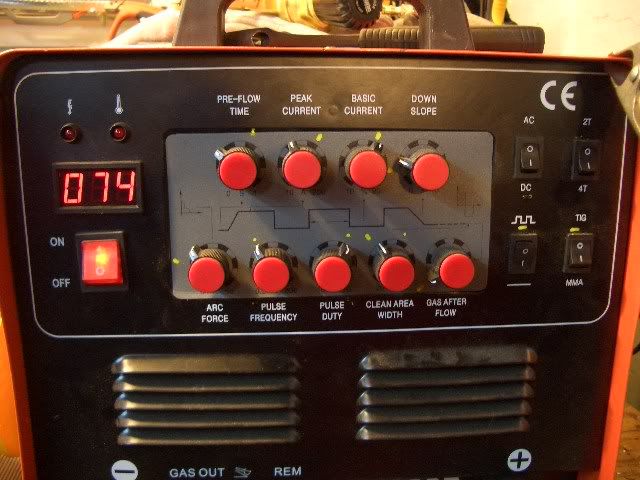
  Top left knob, PRE-FLOW TIME. Use this to adjust the amount of time that your argon flows after you hit the pedal and before the arc starts. Generally you don't need much more than a second or less of pre-flow, any more and you're wasting gas.

  Top row, next one to the right, PEAK CURRENT. This controls the maximum amperage available when the pedal is mashed all the way. I generally leave mine set to the maximum, and control it with the pedal, unless I'm welding something very thin.

  Top row, third from left, BASIC CURRENT. This is used in conjunction with the pulse feature. It should be set to a lower level than the PEAK CURRENT knob. (more about pulse later)

  Top row, far right, DOWN SLOPE. This controls how much time the machine takes to decrease welding current to zero when you let off the pedal. I usually keep mine set at zero and use the pedal to control it.

  Bottom row, left, ARC FORCE. I don't have this adjustment and am not quite sure what it would do to be honest. It may be an adjustment for the high frequency stabilization to allow you to use less in sensitive situations. I do know that some Miller and Lincoln square wave inverter machines have such an adjustment that allows welding without any high frequency at all when around computers and other equipment that may be damaged by it.

Bottom row, second from left, PULSE FREQUENCY. This is control for the built in pulse feature, which mimics pumping the pedal to turn the amperage up and down while welding. The benefit is that the machine is able to do it with perfect timing, and supposedly make more consistent welds. Frequency is just what it sounds like, how may times a minute or second it goes from peak to base current.

  Bottom row, third from left, PULSE DUTY. This controls the percentage of time during the pulse cycle that the amperage is at maximum. I believe that the higher the knob is set the more time it will be at max, but experiment with it to see for yourself if you want to use the pulse feature.

  Bottom row, fourth from left, CLEAN AREA WIDTH. This controls the percentage of time that the AC welding current is in electrode positive or electrode negative portion of the sine wave. One of the big advantages of inverter welders is that the circuitry can control the sine wave to make it asymetrical. This can be a big advantage in some instances, such as welding a dirty casting (you would want to set it so that you got more cleaning action, the electrons flowing from the metal toward the electrode carry impurities with them to the top of the pool), or getting extra penetration in very clean material (more electrons flowing from the electrode to the material makes more heat into the work.) Most of the time the middle position will be where you want to be, leave it set there while learning.

  Bottom row, right, GAS AFTER FLOW. This controls how long the argon flows after the current stops. For aluminum, you want afterflow to keep the weld pool shielded until it cools enough that atmospheric gasses won't contaminate it. I leave mine set to max when welding aluminum. It uses more gas but makes better welds with less pitting at the end of the bead.

It looks like you've got the switches figured out. I'd recommend leaving the Pulse feature turned off while you're learning the basic technique. Most welders I know don't use it even if their machines have it.

This is how I understand it and what works for me, like I said before, your mileage may vary.  8-)

« Last Edit: March 14, 2010, 06:43:08 PM by WhizzbangK.C. »
Ah, this is obviously some strange usage of the word 'safe' that I wasn't previously aware of.  Douglas Adams

Offline donpearsall

  • Sr. Member
  • ****
  • Posts: 873
    • http://soundappraisal.com
Re: Any experienced TIG alu-welders out there ?
« Reply #29 on: March 14, 2010, 07:29:04 PM »
TIG welding is great and has its place for fabrication. However for a lot of aluminum fabrication and repairs I just use the aluminum brazing/soldering rods like Muggyweld and others sell. No need to haul out my TIG welder and waste gas and electricity. All it takes is a MAPP torch or Oxyacetelyne torch. And there is not too much danger of ruining the original part, either. Just recently I repaired a broken cast Al motorcycle footpeg. There was no way I would even attempt to TIG it, but it soldered up real well and I could jump on it and it did not break.

Don
550 hp 2003 Suzuki Hayabusa Land Speed Racer