Author Topic: APS/Ω Gas turbine bike build  (Read 937216 times)

0 Members and 5 Guests are viewing this topic.

Offline Seldom Seen Slim

  • Nancy and me and the pit bike
  • Administrator
  • Hero Member
  • ***
  • Posts: 13168
  • Nancy -- 201.913 mph record on a production ZX15!
    • Nancy and Jon's personal website.
Re: APS/Ω Gas turbine bike build
« Reply #1545 on: January 18, 2017, 06:39:27 AM »
Neil, that was a long time ago.  I never 'til just now when I read your query, had thought about it.  Why'd Bompa pour the used turp back into the bottle?  He's been dead for quite a few years now - so I guess I won't have a good answer for the question. :? :roll:
Jon E. Wennerberg
 a/k/a Seldom Seen Slim
 Skandia, Michigan
 (that's way up north)
2 Club member x2
Owner of landracing.com

Offline Mobacken Racing

  • Sr. Member
  • ****
  • Posts: 849
  • Turbine junkie
    • Mobacken Racing
Re: APS/Ω Gas turbine bike build
« Reply #1546 on: January 18, 2017, 05:49:23 PM »
I´ve had second thoughts about my original idea with the split oil return line, it gets in the way of the combustor lid and there is no way of knowing if the o-ring sealed coupling has sealed properly when assembling the engine.


Luckily I figured out a better and simpler design. :)


I cut away the o-ring seal and threw it in the scrap bin, then I extended the scavenge line a bit and made a bracket to secure it in place.


The idea is to make a thin sleeve that will be inserted through a hole in the engine cover and slide over this pipe end, this way I will clearly see that there is a good fit of the two parts when I assemble the engine.

I will cut away a small section of the combustor to allow it to heat expand without touching the scavenge pipe. The internal oil lines will later be ceramic coated for minimum radiant heat transfer to the oil.


Cheers!
/Anders

Offline Mobacken Racing

  • Sr. Member
  • ****
  • Posts: 849
  • Turbine junkie
    • Mobacken Racing
Re: APS/Ω Gas turbine bike build
« Reply #1547 on: January 20, 2017, 05:00:51 PM »
I´ve been doing lots of thinking about the engine cover lately, or to be more specific the fastening of it to the compressor cover. Drilling and threading a ring of holes in the compressor cover edge is the usual way of doing it, but I cannot drill very deep at all before the holes enter the diffuser channels.

Plus I have made it this far without messing up the cover so if I can find a way that doesen´t include any more machining in it I would be relieved. :)


I think I can come up with some sort of brackets that will be sturdy enough and still not look stupid, but I will let it cook for a while and continue building the engine.


The protruding edge is there to protect the fragile fuel manifold from damage when the engine is being handled.


The engine is left over night to cool down so tomorrow morning I will go check if the cover can be removed easily or if it has distorted during welding.


Cheers!
/Anders
« Last Edit: January 20, 2017, 05:06:50 PM by Mobacken Racing »

Offline Mobacken Racing

  • Sr. Member
  • ****
  • Posts: 849
  • Turbine junkie
    • Mobacken Racing
Re: APS/Ω Gas turbine bike build
« Reply #1548 on: January 21, 2017, 03:58:41 PM »
I removed the can today and everything is warp-free, great!


I also made a list of the jobs left to do before the engine is ready for a test run, many minor jobs like soldering the injector needles but also a fair amount of larger jobs like the starter motor and the test stand so I think I will have my hands full to get it assembled before the end of 2017.

If it takes another year I don´t mind, I want to do this build properly since JU-02 feels like the power source I will use for years to come. :)

Cheers!
/Anders
« Last Edit: January 21, 2017, 04:00:45 PM by Mobacken Racing »

Offline Mobacken Racing

  • Sr. Member
  • ****
  • Posts: 849
  • Turbine junkie
    • Mobacken Racing
Re: APS/Ω Gas turbine bike build
« Reply #1549 on: January 22, 2017, 06:12:25 PM »
This was one of those days when I went out to the workshop with no clue how to solve a problem and a couple of hours later I walk back in having come up with a way better solution than I could dare hope for. The plan was to figure out how to build the oil return line before the evening was over.


I made a threaded connection and welded it to the end of the oil return line so it would sit just inside the engine cover.


With the plasma cutter I cut a window in the engine cover and made a plate that fit the hole.


With a thin copper washer as a shim between the inner oil line and the plate I used the hose connection to screw the parts together and tacked the plate in place.


After that I welded the plate, well aware that the engine cover would warp and need some massaging with a hammer later.


Hose connection test fitted.


Finally I fitted the engine internals just to see how everything would line up, it turned out great so one of the more gruesome jobs was done!


Cheers!
/Anders
« Last Edit: January 22, 2017, 06:14:53 PM by Mobacken Racing »

Offline manta22

  • Hero Member
  • *****
  • Posts: 4146
  • What, me worry?
Re: APS/Ω Gas turbine bike build
« Reply #1550 on: January 22, 2017, 07:19:22 PM »
Good job, Anders. Sometimes Murphy's Law is suspended briefly!

Regards, Neil  Tucson, AZ

Offline Mobacken Racing

  • Sr. Member
  • ****
  • Posts: 849
  • Turbine junkie
    • Mobacken Racing
Re: APS/Ω Gas turbine bike build
« Reply #1551 on: January 24, 2017, 04:04:14 PM »
Good job, Anders. Sometimes Murphy's Law is suspended briefly!

Regards, Neil  Tucson, AZ

Thanks Neil! :-)

Offline Mobacken Racing

  • Sr. Member
  • ****
  • Posts: 849
  • Turbine junkie
    • Mobacken Racing
Re: APS/Ω Gas turbine bike build
« Reply #1552 on: January 26, 2017, 04:13:29 PM »
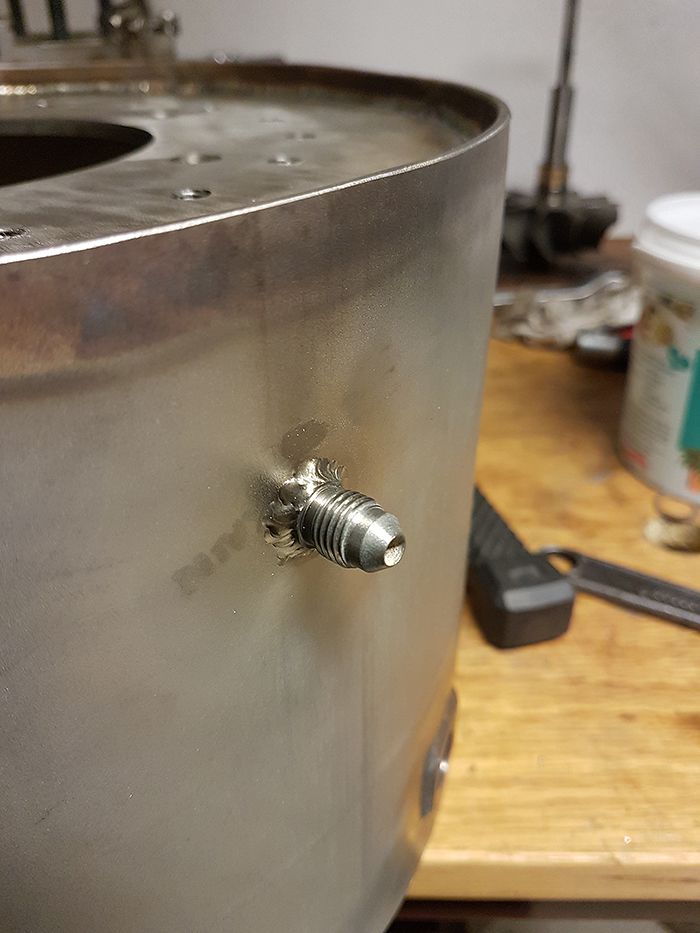
There are plenty of stuff that needs to be fastened to the engine cover, P2 gauge metering, engine mounts etc etc. Here I have welded a drain coupling to the bottom of the cover so I can check that there are no internal leaks.


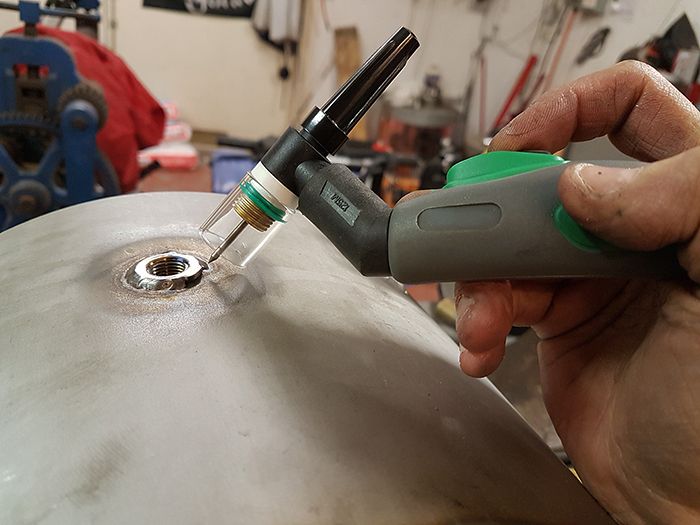
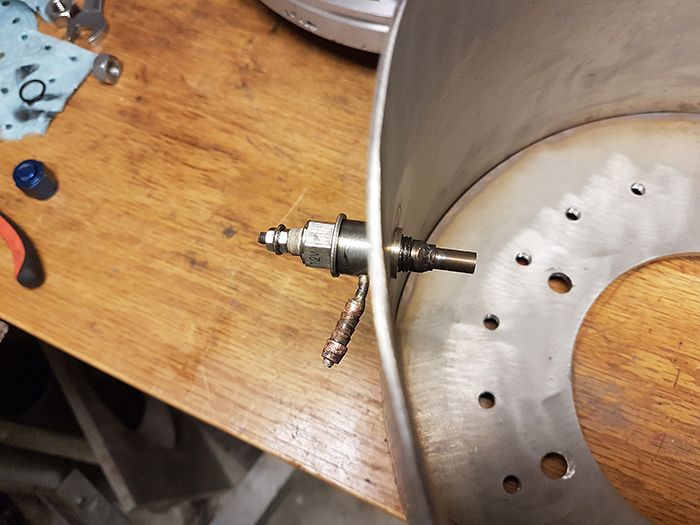
Here below I am in the process of welding a threaded fitting to the cover that will hold the propane preheater. I am trying out a Pyrex gas lens for the tig welder, nice to get that extra field of view of the part I am welding.


The idea in the long run is to use a small camping propane bottle strapped to the bike for preheating, but during the bench tests I will probably use the old and trusted 5kg propane tank.

I have also bought a timer module since I need to preheat the glow plug for 10-15s before the gas valve is operated, if not the gas won´t light.


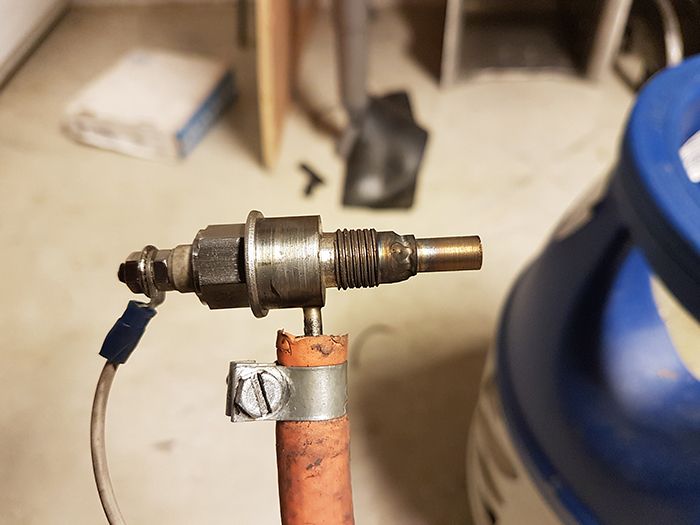
Plenty of graphite lube on the threads since stainless threads have a nasty habit of fusing together.


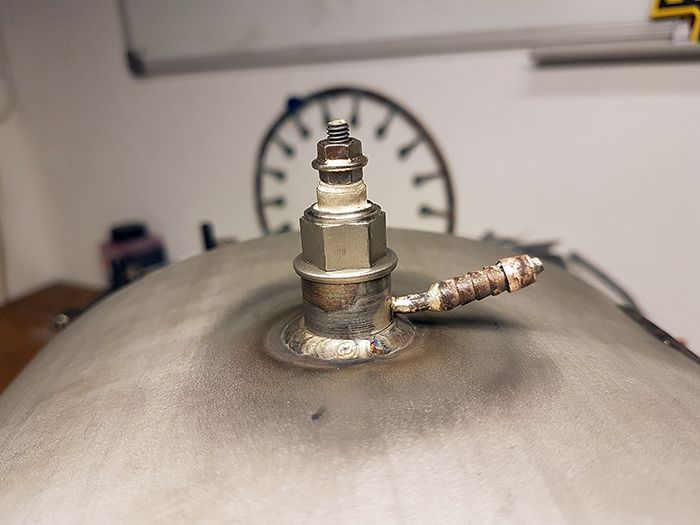
Here you can see the preheater sticking into the engine, I will mark and drill a hole in the combustor outer liner in which the preheater tip will protrude.


Cheers!
/Anders
« Last Edit: January 26, 2017, 04:16:01 PM by Mobacken Racing »

Offline manta22

  • Hero Member
  • *****
  • Posts: 4146
  • What, me worry?
Re: APS/Ω Gas turbine bike build
« Reply #1553 on: January 26, 2017, 07:01:31 PM »
Let us know how you like your Pyrex torch cup, Anders.

Regards, Neil  Tucson, AZ

Offline Mobacken Racing

  • Sr. Member
  • ****
  • Posts: 849
  • Turbine junkie
    • Mobacken Racing
Re: APS/Ω Gas turbine bike build
« Reply #1554 on: January 27, 2017, 03:52:25 AM »
Let us know how you like your Pyrex torch cup, Anders.

Regards, Neil  Tucson, AZ

I kind of like it, it is a bit wider than the no.8 ceramic cup I used before due to the glass thickness and the fact that it is straight rather than tapered but it hasn´t bothered me so far.

For AC welding I will switch to ceramic cups since the heat would probably toast the silicone o-rings that holds the Pyrex cup in place.

Offline Mobacken Racing

  • Sr. Member
  • ****
  • Posts: 849
  • Turbine junkie
    • Mobacken Racing
Re: APS/Ω Gas turbine bike build
« Reply #1555 on: January 27, 2017, 05:13:47 PM »
I got a day off work since I´ve been on call for a week, so with my feancee at her job and kids at school I got lots of work around the house done. Some of it in the workshop. Here you can see that it is just a little bit of grinding needed for the preheater end to fit into one of the combustor holes.


Aaaaaaaand....it fits! (engine is upside down for those who wonder why the oil drain is on top...) :)


After that I spent an hour cleaning up the workshop and another wiping some chain lube from the bike and installing the rear fairings, not bad for a Friday morning. Good evening friends! :)
« Last Edit: January 27, 2017, 05:16:24 PM by Mobacken Racing »

Offline Mobacken Racing

  • Sr. Member
  • ****
  • Posts: 849
  • Turbine junkie
    • Mobacken Racing
Re: APS/Ω Gas turbine bike build
« Reply #1556 on: January 28, 2017, 05:00:49 PM »
After the kids were put to sleep I went to the workshop to get an hour of work done on the combustor, first job was to open up the clearance between the combustor lid and the oil return line. I welded the cut after the pic was taken.


Then I angled some of the liner holes according to John´s JU-01 combustor drawing, the JU-02 combustor design is more or less a copy of JU-01´s since it has worked very good for me.


Before the evaporator tubes could be welded to the NGV I had to give them some D-ing to improve the internal turbulence and hopefully get better mixing of the kero and air. I had a jig that I made for the JU-01 build so it was a quick job.


18 evaporators finished!


This is what they look like on the inside, 15 years of manual labor is starting to show on my hands by the way... :)


Then the evaporator tubes were welded to the NGV, I could have silver soldered them but I don´t have a gas torch powerful enough for the job and I kind of trust a tig weld more than solder.


Another job on the list that can be crossed over, great! :)


Cheers!
/Anders

Offline stay`tee

  • Sr. Member
  • ****
  • Posts: 613
  • "Kawasaki ZX12 Turbocharged"
Re: APS/Ω Gas turbine bike build
« Reply #1557 on: January 28, 2017, 07:37:14 PM »
Arrr, that good `ole Italian fella "Manual Labour"  :-D
First Australian to ride a motorcycle over 200mph at Bonneville,,,

Offline Mobacken Racing

  • Sr. Member
  • ****
  • Posts: 849
  • Turbine junkie
    • Mobacken Racing
Re: APS/Ω Gas turbine bike build
« Reply #1558 on: January 31, 2017, 04:31:45 PM »
It would probably be wisest to wait with the JU-02 injectors until I have test started the bike and confirmed that the injector design actually works, but since I have nothing better to do I´ll take my chances. :)


I had to think a bit outside the box to drill the 0.8mm holes in the brass nozzles where the syringe needles will be fitted.


With that done I cut and deburred 18 syringe needles to the correct length and set everything up for silver soldering.


The injectors are soldered and the syringe tips are bent, now I just need to make a test rig so I can check that all of the injectors flow the same and have a fine spray pattern.


Cheers!
/Anders

Offline bbarn

  • Sr. Member
  • ****
  • Posts: 618
Re: APS/Ω Gas turbine bike build
« Reply #1559 on: February 01, 2017, 08:47:25 AM »
I love logging in to LR and hitting "Show unread posts..." and seeing updates on your project(s) Anders. I really admire your craftsmanship, ingenuity and general "style". You do a great job of showing your skills and are quite humble at the same time.   
I almost never wake up cranky, I usually just let her sleep in.