Old Scrambler
Sr. Member
  
Offline
Age: 70
Location: Plymouth, WI
Posts: 640
Going Fast - Slowly
|
 |
« Reply #690 on: October 16, 2014, 11:04:12 AM » |
|
|
|
|
Logged
|
2011 AMA Record - 250cc M-PG TRIUMPH Tiger Cub - 82.5 mph 2013 AMA Record - 250cc MPS-PG TRIUMPH Tiger Cub - 88.7 mph 2016 AMA Record - 750cc M-CG HONDA CB750 sohc - 130.7 mph 2016 AMA Record - 750cc MPS-CG HONDA CB750 sohc - 137.7 mph Chasis Builder / Tuner: Dave Murre
|
|
|
wobblywalrus
|
 |
« Reply #691 on: October 16, 2014, 12:37:11 PM » |
|
Lots of years ago I was a construction laborer and I wanted to upgrade to carpenter. I tried the job for a day and I did that measure twice and cut once deal. The foreman came over and said "We do not have time for that BS, measure once and cut the dang thing. If you need to do it twice you need to find another job."
|
|
|
Logged
|
|
|
|
Old Scrambler
Sr. Member
  
Offline
Age: 70
Location: Plymouth, WI
Posts: 640
Going Fast - Slowly
|
 |
« Reply #692 on: October 16, 2014, 01:15:24 PM » |
|
One measurement is physical, the other is the mental application drawn from experience. Bo..........you probably didn't need the second physical measurement by the end of the first day.
Today's school teachers instruct the students to estimate the answer before attempting to calculate the outcome. This places experience at a higher level but also challenges each student to FOCUS on the problem at hand.............not the dream in the window.
I'm still transitioning from the 'dreamer' to the 'I did it' phase of my time on this earth..............as measured by results.
|
|
|
Logged
|
2011 AMA Record - 250cc M-PG TRIUMPH Tiger Cub - 82.5 mph 2013 AMA Record - 250cc MPS-PG TRIUMPH Tiger Cub - 88.7 mph 2016 AMA Record - 750cc M-CG HONDA CB750 sohc - 130.7 mph 2016 AMA Record - 750cc MPS-CG HONDA CB750 sohc - 137.7 mph Chasis Builder / Tuner: Dave Murre
|
|
|
Mobacken Racing
Sr. Member
  
Offline
Age: 36
Location: Östersund - Sweden
Posts: 815
Turbine junkie
|
 |
« Reply #693 on: October 22, 2014, 01:45:24 PM » |
|
I started working on the rear fairing last night, lots of styrofoam dust that clings to every Dodge thing in my workshop but I prefer that to be working outside in the dark and snow.    Here the styrofoam pieces are glued in place and it was time to get even dirtier, I used the angle grinder with a scotchbrite disc to get some shape to the fairing, then I continued an hour with sand paper before it was time to hit the bed.  I hope to find a couple of hours tomorrow to continue working on the fairing, I have ordered a length of 10mm ss2348 pipe to make new evaporator tubes so until it arrives I will struggle on with this.  Cheers! /Anders
|
|
|
Logged
|
|
|
|
saltwheels262
Hero Member
   
Offline
Age: 64
Location: cumberland plateau
Posts: 1062
LTA 7/2013
|
 |
« Reply #694 on: October 23, 2014, 07:07:19 AM » |
|
looks good. bf262
|
|
|
Logged
|
bub '07 - 140.293 a/pg 120" crate street mill bub '10 - 158.100 sweetooth gear lta 7/11 -163.389 7/17/11; 3 run avg.-162.450 ohio - - 185.076 w/#684 lta 8/14 - 169.xxx. w/sw2 '16 -- 0 runs ; 0 events -- made a 2 state change in ZIP codes
" it's not as easy as it looks. " - franey 8/2007
|
|
|
Mobacken Racing
Sr. Member
  
Offline
Age: 36
Location: Östersund - Sweden
Posts: 815
Turbine junkie
|
 |
« Reply #695 on: October 24, 2014, 02:15:33 PM » |
|
looks good. bf262
Thanks!  Last night I made the jig for the evaporator tubes, I wanted to make an inlet radius and four depressions in the walls to make the heat exchange a bit better.  After a couple of hours on the mill and lathe I had these parts on the work bench, the bundle of tubes are the material for the new evaps in 316L stainless.  I use a M12 screw to set the length of the tubes when I punch the radius, very easy to adjust the length with it.  Here is the first test evaporator tube after some bashing in the jig, the radius could be a bit larger but other than that it looks ok to me.  Cheers! /Anders
|
|
|
Logged
|
|
|
|
Mobacken Racing
Sr. Member
  
Offline
Age: 36
Location: Östersund - Sweden
Posts: 815
Turbine junkie
|
 |
« Reply #696 on: October 25, 2014, 06:24:40 AM » |
|
I finished the evaps this morning, piece of cake when you have made a proper jig for the job.  First off I pressed the inlet radius on all 18 pipes...  ...and then I took them down to the proper length in the lathe. 100mm long leaves 13mm clearance to the combustor wall.  While working on pipes you really need to listen to some proper music for the best result.   With "Hits from the Bong" at full throttle on the stereo I punched the four side dimples in all evap tubes.  
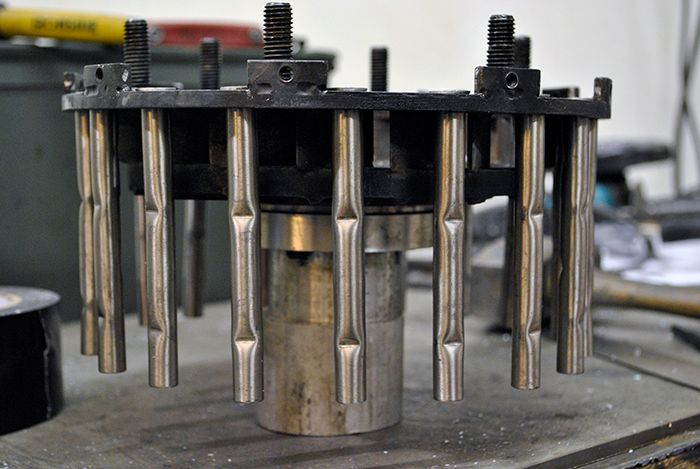
18 evaporator tubes ready to be installed!  I removed the old tubes from the NGV housing and milled a radius to the holes...  
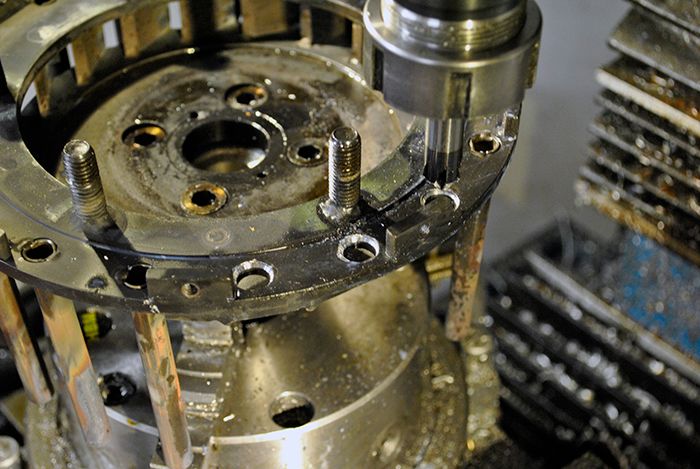
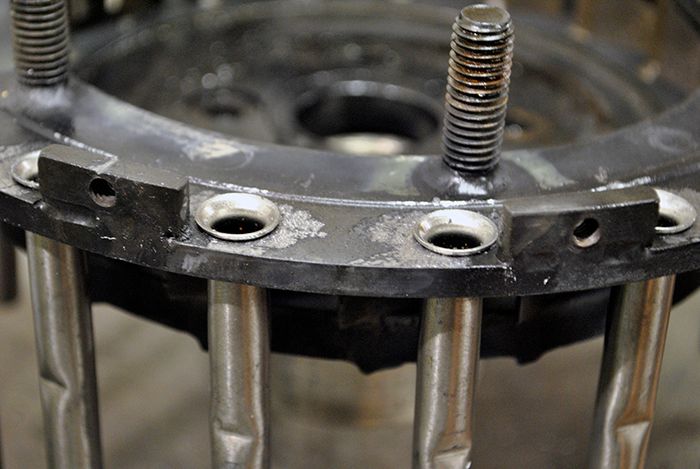
...and fitted the new evaporators.  The dimples are placed so the syringe jet hits the tube wall just before the first one. It would be really interesting to have a look in there somehow to see what is happening during combustion, all we can do is make qualified guesses on what is going on.  Cheers! /Anders
|
|
« Last Edit: October 25, 2014, 06:26:59 AM by Mobacken Racing »
|
Logged
|
|
|
|
tauruck
|
 |
« Reply #697 on: October 25, 2014, 07:12:32 AM » |
|
Awesome work there Anders and I like the foam buck. It looks like it will turn out great. 
|
|
|
Logged
|
|
|
|
Mobacken Racing
Sr. Member
  
Offline
Age: 36
Location: Östersund - Sweden
Posts: 815
Turbine junkie
|
 |
« Reply #698 on: October 25, 2014, 08:23:22 AM » |
|
Awesome work there Anders and I like the foam buck. It looks like it will turn out great.  Thanks! Especially good to hear that the fairing plug looks acceptable since I´ve never done anything like it before. 
|
|
|
Logged
|
|
|
|
wobblywalrus
|
 |
« Reply #699 on: October 25, 2014, 08:55:58 PM » |
|
Thanks for posting all of this, Anders. I know it is a lot of work in addition to the building aspect. It is appreciated.
|
|
|
Logged
|
|
|
|
Mobacken Racing
Sr. Member
  
Offline
Age: 36
Location: Östersund - Sweden
Posts: 815
Turbine junkie
|
 |
« Reply #700 on: October 26, 2014, 03:23:41 AM » |
|
You are welcome, it does take some time to write everything down but I like doing it. I try to make my build threads into something I would enjoy reading myself.  The build thread also doubles as a project diary, countless times I have digged through a thread to find out about a test run a couple of years ago or something else I have forgotten all about. Cheers! /Anders
|
|
|
Logged
|
|
|
|
Mobacken Racing
Sr. Member
  
Offline
Age: 36
Location: Östersund - Sweden
Posts: 815
Turbine junkie
|
 |
« Reply #701 on: October 26, 2014, 04:46:41 PM » |
|
I got a few hours for myself tonight so I tacked the evaporator tubes in place and was just about to align them when I took this picture. With the evaporators aligned and welded in place I could fit the combustor to the NGV housing again, I really thought this would take longer to get done but everything from ordering the material to the jig making went really well.  Another thing that needed fixing was the partially blocked injectors, with compressed air blowing in the direction of the flow I managed to open up one of the syringes but the second one needed to be replaced. With the new syringe injector silver soldered in place I could do the propane test again and now it looks much better.   Finally I put some more filler on the plug for the rear fender, I have to take it in steps so the filler have time to set properly.  Cheers! /Anders
|
|
|
Logged
|
|
|
|
Glen
Global Moderator
Hero Member
 
Offline
Age: 82
Location: South West Utah
Posts: 6955
SCTA/BNI timer 1983 to 2004, Retired,. Crew on Tur
|
 |
« Reply #702 on: October 26, 2014, 05:55:28 PM » |
|
Looking great as usual with your work.
|
|
|
Logged
|
Glen Crew on Turbinator II
South West, Utah
|
|
|
bbarn
Sr. Member
  
Offline
Age: 48
Location: Harmony, PA
Posts: 617
|
 |
« Reply #703 on: October 26, 2014, 06:06:42 PM » |
|
Nice job Anders! Tip: buy a cheap air gun/sprayer and some PVA. Write PVA only on the gun and use it to spray only PVA. It is a release agent for your molds, you'll be happy you used it. It is water soluble and edible, you can spray it anywhere. You can also brush it if you like, but spray give a more even coat.
When you get ready to layup your mold, there are several tips that can make it easier if you haven't worked with glass and molds before.
|
|
|
Logged
|
I almost never wake up cranky, I usually just let her sleep in.
|
|
|
Mobacken Racing
Sr. Member
  
Offline
Age: 36
Location: Östersund - Sweden
Posts: 815
Turbine junkie
|
 |
« Reply #704 on: October 26, 2014, 11:39:02 PM » |
|
Thank you Glen! Nice job Anders! Tip: buy a cheap air gun/sprayer and some PVA. Write PVA only on the gun and use it to spray only PVA. It is a release agent for your molds, you'll be happy you used it. It is water soluble and edible, you can spray it anywhere. You can also brush it if you like, but spray give a more even coat.
When you get ready to layup your mold, there are several tips that can make it easier if you haven't worked with glass and molds before.
That is a great tip, I have a spare spray gun that can be used for this. I would appreciate any tips on this since I am new to this glass fibre business.
|
|
|
Logged
|
|
|
|
|