Author Topic: Australian Streamliner Bike Build  (Read 436473 times)

0 Members and 1 Guest are viewing this topic.

Offline WOODY@DDLLC

  • Hero Member
  • *****
  • Posts: 1806
  • ECTA made it to AR-Kansas!
    • Design Dreams, LLC
Re: Australian Streamliner Bike Build
« Reply #810 on: May 19, 2013, 09:33:47 AM »
Larry, it's all about balancing the aerodynamic forces for a given shape under specific operating conditions. Lots of rules of thumb and generalities that may or may not apply to your application. The drag coefficient is not dependent on frontal area. It is used to compare different shapes in conjunction with the frontal area - Cd * A. An egg and a sugar cube have the same CdA so you can put a bigger passenger & engine in an egg and go faster than a sugar cube. But if you round the corners of the sugar cube just a little bit and put a tail on it the drag goes way down so the real world solution is somewhere between the extremes. It's all just a packaging and traction problem in the end!  :cheers:

For a single track motorcycle "fuselage" brought next to the ground the drag penalty is surprisingly small. And for the drag you get there is an even bigger increase in down force. Down force is not free but pretty cheap in this case! (L/D) When you stick the wheels in it (spinning or not) the drag and down forces change again. When you fair the wheels drag goes down but the yaw responses change negatively!  :-(

My first impression of Jon's concept was that it was too short but Jon insisted on NO long tail. We went through several iterations and lots of digital discourse to arrive at the current solution which is a good set of engineered compromises. The interactions are just too complex - to be safe you have to test - not guess!  :cheers:

BTW: I can testify to Jon's anality since I have a PhD in anality, too!  :-D

OK, Jon now get this sugar cube running!  :cheers:
All models are wrong, but some are useful! G.E. Box (1967) www.designdreams.biz

Offline Jon

  • Sr. Member
  • ****
  • Posts: 852
Re: Australian Streamliner Bike Build
« Reply #811 on: June 10, 2013, 06:43:08 AM »
Had a visit from Nicholai (Fastlami) and a few of his mates, we also caught up with Ross and checked out the progress on his triple engine liner.
Was a good time and I look forward to seeing Nicholai's build, he has the skills to do the job looking at some of his and his friends current and previous projects.

Got a bit of time to do some work in my bike, been a little distracted lately.

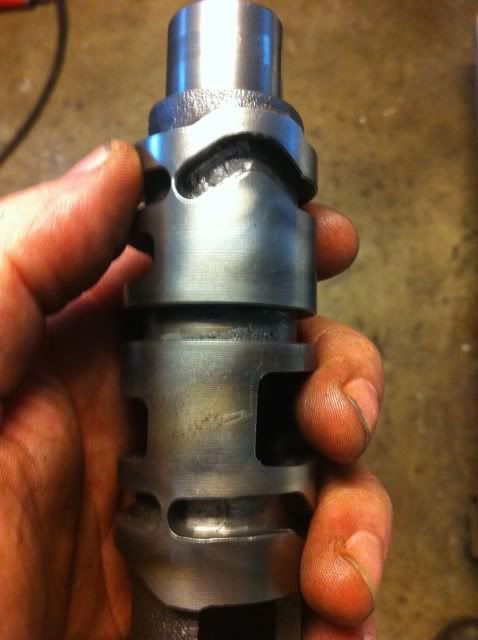
Modified a shift drum to put Neutral on bottom so I can get an airshift to work reliably.
Trying to get Neutral which is a 1/2 shift between 1st and 2nd gears isn't going to happen with an airshift.
 The standard drum has 5 shifts of 60 degrees each which made the job a fair bit easier. 2 shift-fork slots just needed extending by 1/2 a shift (30 degrees), the 3rd slot needed to ramp from 1st back to Neutral in the same distance.

The shift fork travels 6mm to go from Neutral to a gear, 6mm in 30 degrees = 1mm in 5 degrees so a bit of fiddling around then a bit of hand finishing with a die grinder came up ok.


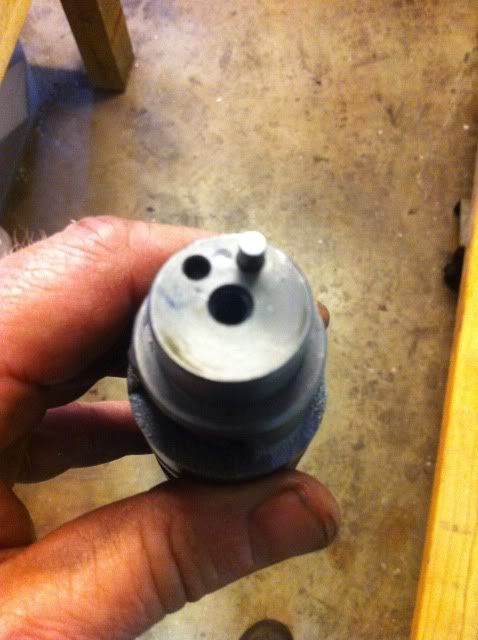
Then moved the shift star locating dowel by 1 full shift (60 degrees);

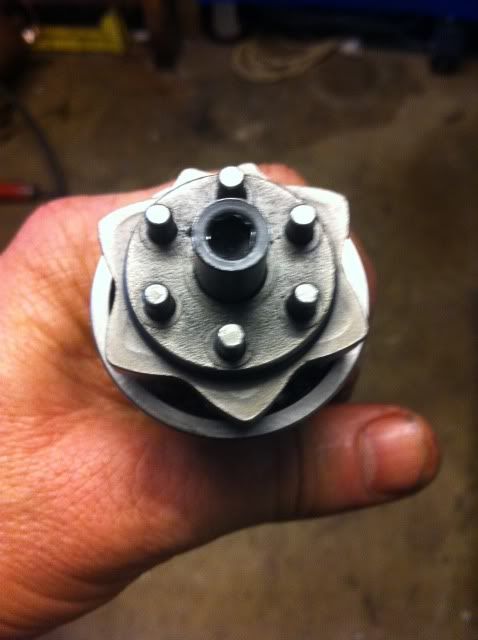
Shift star bolted back on and fingers crossed and we have an Underhouse Engineering Neutral on bottom shift drum for a Hayabusa, you can see the 1/2 shift detent at the top of the star.


Have a wide ratio gearset dummied up in, will have a go at undercutting it and then test the shift drum.
Some tool steel shiftrods going in to help live with the shock of an airshift and that's all the mods the motor will get before the first year, I wouldn't have opened it at all if it wasn't for wanting Neutral in bottom.

Cheers
jon
Underhouse Engineering
Luck = Opportunity + Preparation^3

Offline SPARKY

  • Global Moderator
  • Hero Member
  • ***
  • Posts: 6912
Re: Australian Streamliner Bike Build
« Reply #812 on: June 10, 2013, 08:53:57 AM »
 :cheers:
Miss LIBERTY,  changing T.K.I.  to noise, dust, rust, BLUE HATS & hopefully not scrap!!

"Security is mostly a superstition. It does not exist in nature, nor do the children of men as a whole experience it. Avoiding danger is no safer in the long run than outright exposure. Life is either a daring adventure or nothing."   Helen Keller

We are going to explore the racing N words NITROUS & NITRO!

Offline Jon

  • Sr. Member
  • ****
  • Posts: 852
Re: Australian Streamliner Bike Build
« Reply #813 on: June 15, 2013, 05:49:23 AM »
Got the trans dummied together today, shifts like a standard trans :).
It should; the only shift that is not original is from Neutral to first.

Did one for 750 motor today, drilled one of the holes to reclock the shift star then convinced myself I'd gone the wrong way so drilled two in the opposite direction.
Sure enough; put it together and I'd gone the wrong way..... :/
Lightening holes are good aren't they?

Going to have a crack at undercutting my trans dogs tomorrow.

Cheers
jon
Underhouse Engineering
Luck = Opportunity + Preparation^3

Offline maj

  • Sr. Member
  • ****
  • Posts: 743
Re: Australian Streamliner Bike Build
« Reply #814 on: June 15, 2013, 09:41:35 AM »
Did one for 750 motor today,
jon

  :-D  :cheers:

If you want a practice on any gears the 750 box is not considered fully functional  , second was noisy , cut it to death if you want

Offline rd400f

  • New folks
  • Posts: 15
Re: Australian Streamliner Bike Build
« Reply #815 on: June 15, 2013, 04:19:41 PM »
Got the trans dummied together today, shifts like a standard trans :).
It should; the only shift that is not original is from Neutral to first.

Did one for 750 motor today, drilled one of the holes to reclock the shift star then convinced myself I'd gone the wrong way so drilled two in the opposite direction.
Sure enough; put it together and I'd gone the wrong way..... :/
Lightening holes are good aren't they?

Going to have a crack at undercutting my trans dogs tomorrow.

Cheers
jon


Hi
As many pics as you can during the undercutting please.
I have always wanted to try it myself.
Thanks
Richard

Offline wobblywalrus

  • Hero Member
  • *****
  • Posts: 5503
Re: Australian Streamliner Bike Build
« Reply #816 on: June 16, 2013, 01:56:44 AM »
Jon, pay attention to making sure that all of the under cut dogs are in contact with each other and all of them are carrying the load.  It is hard to do this.  Lots of fiddling to get it right.

Offline Jon

  • Sr. Member
  • ****
  • Posts: 852
Re: Australian Streamliner Bike Build
« Reply #817 on: June 16, 2013, 03:21:03 AM »
Thanks guys

The undercutting is going to wait a while.
I'm running the motor standard until I settle my bike down and I learn to ride to ride it.
To do it properly I need to get a 5 degree reverse taper endmill, my little mill has a tilting head but the heal of the cutter would prevent me getting the results I want.
Rather than have the motor sit around open while I order a cutter I closed it up.

When I start chasing a bit more power the motor will be coming apart for other work as well, this is likely to be a couple years away.
With the right cutter and using a dividing head I should be able to get a reasonable job I think.

Closed the motor up and did a couple non Streamliner related jobs today.

Cheers
Jon
Underhouse Engineering
Luck = Opportunity + Preparation^3

Offline Jon

  • Sr. Member
  • ****
  • Posts: 852
Re: Australian Streamliner Bike Build
« Reply #818 on: June 22, 2013, 03:50:09 AM »
Got a rostered week off and the forecast looks good so fibreglassing the body-shell is the plan.

Spent most of the afternoon with a sander learning how poorly I did the first layer of fibreglass, most of it is ok but I didn't get all the bubbles out in a few areas :(

Like anything new its a learning curve, no great loss other than a bit of time and a heap of sanding.
I think I over squeegeed a bit too as some areas are a bit short of resin in the top of the cloth, it's all wet but its got dips between the threads in the cloth.
The good news is it won't be hard to make the next layer better :)

Some more parts of the pneumatic system turned up, manifold with banked solenoids:

Manifold has more stations than I need but having spare spots could be handy over time, just need to make some blanking plates.
The wiring caps have LEDs in them and the solenoids have manual buttons on them to make troubleshooting easier.

Cheers
jon
Underhouse Engineering
Luck = Opportunity + Preparation^3

Offline Jon

  • Sr. Member
  • ****
  • Posts: 852
Re: Australian Streamliner Bike Build
« Reply #819 on: June 27, 2013, 04:10:02 AM »
The Busa motor fits;


It's snug, if it wasn't the bike would be too big. :)

Cottam Engineering are starting on machining works on Greg's and my Underdrive units.
I won't mount the motor until the Underdrive unit is in, will probably need to redo the rear suspension to gain some room back.

Cheers
jon
Underhouse Engineering
Luck = Opportunity + Preparation^3

Offline wobblywalrus

  • Hero Member
  • *****
  • Posts: 5503
Re: Australian Streamliner Bike Build
« Reply #820 on: June 28, 2013, 01:28:40 AM »
Jon, it might be best to buy some under cut gears.  It is a lot of work to cut them.  It is important to have radiused corners at the base of the dogs to reduce the tendency to crack there.  In addition, the hardening is not all that deep on gears and it is easy to get under the hardening when they are undercut.  I certainly would buy some professionally made racing gears if they are available.   

Offline Jon

  • Sr. Member
  • ****
  • Posts: 852
Re: Australian Streamliner Bike Build
« Reply #821 on: June 28, 2013, 07:30:46 PM »
Thanks Bo

No off the shelf undercut dog gears for the gearset I'm running. Greg (Maj) happened across a gearset that gives me a fair bit bigger step from 1st to 2nd (bigger than the aftermarket 1st gears you can buy) and a slightly bigger 5th to 6th than standard.
It gives me about the same 1st to 6th split as the aftermarket gears you can get  but a big split low and smaller splits up high is what I think I need.

I'm trying to track down a endmill with a 5 degree reverse taper (bigger on the end) so that I can get the undercut I want without digging the heel of the tool into the gear.
Fairly easy then to grind the tip of the endmill to a very small radius.

The 3 jaw i have on my little dividing head will grab the gears I have and let me get the offset and indexing right.

With the 5 degree taper in the endmill I can keep the mill head vertical and set up for different height gears without the offset from centreline changing.

I could probably pay someone to do a gearset cheaper than buying the cutter and the time spent getting my head around doing the first gearset (after playing with some junked gears i have) but I if I get it together ok I can then do others.

jon
Underhouse Engineering
Luck = Opportunity + Preparation^3

Offline Jon

  • Sr. Member
  • ****
  • Posts: 852
Re: Australian Streamliner Bike Build
« Reply #822 on: June 29, 2013, 04:36:09 AM »
A couple little machining jobs today, it is a bit damp to be fibreglassing, that happens outside.

Dummied up the turbo and intercooler core so I can sketch up a plenum.
One of the machining jobs needed a bit of alloy and the that I buy alloy off told me today he's bought a waterjet and can work with DXFs.

The plan was for a highmount turbo but the bike told me today that low mount would give me more useable room.

Pushing the motor forward 8" has tightened things up a little.

The turbo and cooler will sit in storage for a few years but I want to mount them and then keep building around them.

Cheers
jon
Underhouse Engineering
Luck = Opportunity + Preparation^3

Offline fastlammy

  • Full Member
  • ***
  • Posts: 65
Re: Australian Streamliner Bike Build
« Reply #823 on: June 29, 2013, 05:24:37 AM »
Lookn good Jon, man that turbo's a monster :evil:

Offline Jon

  • Sr. Member
  • ****
  • Posts: 852
Re: Australian Streamliner Bike Build
« Reply #824 on: June 29, 2013, 09:35:53 AM »
Thanks Nicholai
It just looks big because its in a small space.
Got the intercooler/plenum sketched up:


The blue bit is the core, the angle from the core back to the throttle body is more acute than I would like but it seems normal for most Busa setups in bikes.

Just got to work out how to cut it into sheetmetal sections.

Cheers
jon
Underhouse Engineering
Luck = Opportunity + Preparation^3