Author Topic: Australian Streamliner Bike Build  (Read 436267 times)

0 Members and 1 Guest are viewing this topic.

Offline wobblywalrus

  • Hero Member
  • *****
  • Posts: 5503
Re: Australian Streamliner Bike Build
« Reply #570 on: January 05, 2013, 02:12:11 AM »
It's Friday night here and I was down at the club listening to jazz and yakking it up with my buddies.  Too much fun.  I needed to take a walk around town awhile before I drove home.  I asked myself, "why would Denis have that big tail on BUB 7?" during my nocturnal stroll.  Imagine that there is a side wind.  It will tend to push the nose over with a tailless design.  The side wind will also push on front of the BUB liner.  In contrast to the tailless design, the wind would also push on the tail on the BUB liner.  Consider the rear wheel as a fulcrum point.  The wind pushing on the tail would produce a righting moment that would counteract the side forces on the nose.  The long tail might be a good thing.     

Offline Jon

  • Sr. Member
  • ****
  • Posts: 852
Re: Australian Streamliner Bike Build
« Reply #571 on: January 05, 2013, 05:24:18 AM »
Undoubtably that is why BUB and others have a long tail, and I may be forced into one.
The problem is as you say the back tyre becomes a pivot point.
Any tyre only has a certain amount of traction available, if its working hard pushing you forward and you then put a side load on it there is a risk it will decide to step out, that could be a little unpleasant.

No work on my bike today, helping Dave with his.

Picked up a J Type Laycock to see it if has a place.

Cheers
jon
Underhouse Engineering
Luck = Opportunity + Preparation^3

Offline Jon

  • Sr. Member
  • ****
  • Posts: 852
Re: Australian Streamliner Bike Build
« Reply #572 on: January 06, 2013, 09:41:01 PM »
While waiting for the Busa motor to turn up have been working with Greg Watters on how to get another gear happening.
Greg's build diary is here: http://www.dlra.org.au/forum/viewtopic.php?f=18&t=2006
A proven runner on a sit on bike.

We look at a fair few options from making one out of a car gearbox, Lenco 2 speeds, drag bike 2 speeds etc. most of the were too hard, to big or to expensive or any of your imaginable combinations of those options.

Ideally what we were looking for would fit in the standard chain line width, be small diameter, strong and cheap.

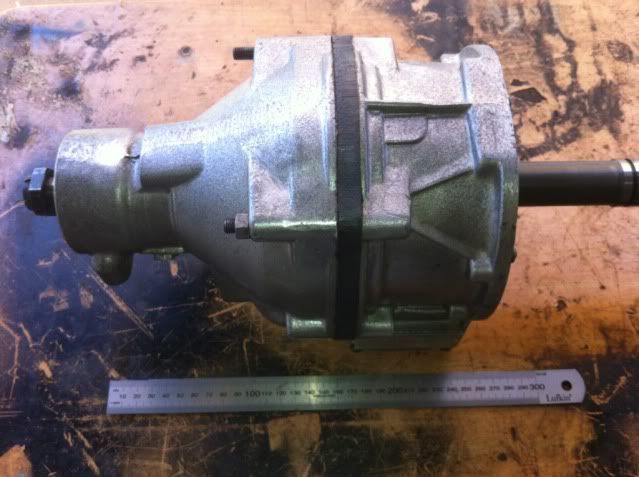
In among our research we came across the Laycock overdrives that at first look had nothing going for them other than small and cheap.

Wasn't after an overdrive, we wanted underdrive and the sprag clutch locked up in the direction that we it would turn in a bike.

We looked at trying to turn the sprag clutch around but as always the real solution is simple.

Turning the box around so Input becomes output and vide versa we now have an underdrive box that turns the way we want.

It can't be that easy though as the box will now want to start off in direct and not have enough pressure to shift to low until moving at speed, that doesn't really help us much.

By having a look at the hydraulic circuit we have worked out where to plug a few galleries and drill one so that the internal pump only runs as a lubrication circuit at 20 psi rather than the 450psi it normally works at.

The shift will be done by CO2 with pressure to hold it in underdrive then releasing to go into direct.

Woodshed and Underhouse engineering at its best, strong, small and home built.

27% is a big gear step but shift it first then it's got I put and output shafts locked together and just along go the ride.

One downside is that the bikes CANNOT go backwards in underdrive, I stripped on today and remove a couple of the springs that hold it in direct and packed the pistons so that it is in underdrive, it works the way we want but will not rotate the wrong way.


Cheers
jon
Underhouse Engineering
Luck = Opportunity + Preparation^3

Offline Rex Schimmer

  • Hero Member
  • *****
  • Posts: 2633
  • Only time and money prevent completion!
Re: Australian Streamliner Bike Build
« Reply #573 on: January 06, 2013, 10:41:50 PM »
Jon,
Just a couple of questions. Does the OD unit use 450 psi to hold the clutches, bans etc to keep it in one gear, OD or straight through? When you use compressed gas are you going to use it over oil so that you are not putting hp gas into the OD unit? When the unit is in direct is the outside gear locked or turning?

Great thinking and it looks like a nice set up, think it will take 600 hp?

Rex
Rex

Not much matters and the rest doesn't matter at all.

Offline Jon

  • Sr. Member
  • ****
  • Posts: 852
Re: Australian Streamliner Bike Build
« Reply #574 on: January 06, 2013, 11:38:44 PM »
Laycock / Gear Vendor 101 for those interested or bored.
Talking in the direction that they normally run not back to front as they will be used in our bikes, it's because we're upside down.

Output shaft is connected directly to the ring gear;

Youu can see the sprag clutch in the middle and the friction surface on the outside of the ring gear:

The planetary set is 19mm wide similar to some of the big $ units.


The input shaft;

The eccentric runs a small piston oil pump, the spline engages the sprag clutch and the planet carrier, there is a oil passage to take lubricating oil to the gears.

The clutch cone and sun gear:

The outside clutch engages the steel section of the housing for overdrive, the inside clutch engages with the ring gear for direct.
The springs push against the main housing to engage it into direct by default.
The pistons push on the bar you can see between the two studs the springs are on to compress the springs and pull the cone to engage overdrive.
The sun gear is fixed to the clutch cone and is a bit wider than the planet gear so that it has full engagement when the cone carrier moves back and forth.

In direct the springs make the clutch cone lock the sun gear and the ring gear together locking the input and output shafts together.

In overdrive the pistons pull the clutch cone and engage it with the housing so that the sun gear is stationary, the input shaft turns the planet gear carrier. The planet gears running around the sun gear turn the outer ring gear and output shaft  faster than the input shaft.

The sprag clutch is only really used to provide drive whil the clutch cone is not engaged with either the housing or the ring gear.

Clear as mud.
jon
Underhouse Engineering
Luck = Opportunity + Preparation^3

Offline Jon

  • Sr. Member
  • ****
  • Posts: 852
Re: Australian Streamliner Bike Build
« Reply #575 on: January 06, 2013, 11:59:00 PM »
Thanks Rex

We were typing at the same time.

According to the Gear Vendor site  Blowfish is splitting each gear with 2000hp so it should laugh at the hp and traction that we have.

Hope not to run a CO2 over oil interface, we can totally isolate the pistons from the rest of the system and hopefully just run CO2 straight to them.

One of the benefits of running it as an under-drive unit is that  it will spend most of its time running direct with the clutch cone engaged by spring pressure, if anything in the CO2 system fails it fails to direct.
Also by going underdrive most of the time the gear system is locked together so not trying to turn energy into heat and noise.

This is a joint thing between Greg and I.

Cheers
jon
Underhouse Engineering
Luck = Opportunity + Preparation^3

Offline maj

  • Sr. Member
  • ****
  • Posts: 743
Re: Australian Streamliner Bike Build
« Reply #576 on: January 07, 2013, 02:57:13 AM »
And you have been doing most of the leg work
Looks good though, should have mine in about 2 weeks  :-D

Offline Jon

  • Sr. Member
  • ****
  • Posts: 852
Re: Australian Streamliner Bike Build
« Reply #577 on: January 07, 2013, 02:58:29 AM »
High tech hydraulic circuit modifications:


Red is the original circuit
Blue line is a drill hole to get fluid straight from the pump to the lubrication circuit.
Blue crosses are plugs, I just tapped part way with a 6mm taper tap and put grub screws in with sealant.
One of the plugs was pretty deep, didn't have a long tap, do now.


Piston actuator circuit needs this plug removed and tapped for CO2 line:


Stupid question of the day:
Will I get reliable CO2 sealing at 450psi with a decent bore and O ring with a backup ring?
I have enough room to fit a backup ring, it currently doesn't have one.


Cheers
jon
Underhouse Engineering
Luck = Opportunity + Preparation^3

Offline grumm441

  • Hero Member
  • *****
  • Posts: 1447
  • HK 327
Re: Australian Streamliner Bike Build
« Reply #578 on: January 07, 2013, 07:40:37 AM »
A backup O ring sounds good, however I would probably use one of those fancy square section X ish shaped rings from your local hydraulic
supplier
G
Chief Motorcycle Steward Dry Lakes Racers Australia Inc
Spirit of Sunshine Bellytank Lakester
https://www.dlra.org.au/rulebook.htm

Offline Koncretekid

  • Hero Member
  • *****
  • Posts: 1203
Re: Australian Streamliner Bike Build
« Reply #579 on: January 07, 2013, 08:22:27 AM »
Is it not possible to simply use a hand hydraulic pump to actuate the pistons?  Release the pressure to get back to direct?  An hydraulic brake master cylinder comes to mind, if it can supply enough fluid.  If not, add a check valve and possibly an accumulator, and pump it several times.
« Last Edit: January 07, 2013, 09:34:21 AM by Koncretekid »
We get too soon oldt, and too late schmart!
Life's uncertain - eat dessert first!

Offline Rex Schimmer

  • Hero Member
  • *****
  • Posts: 2633
  • Only time and money prevent completion!
Re: Australian Streamliner Bike Build
« Reply #580 on: January 07, 2013, 12:38:59 PM »
Jon,
That little plug you have to remove is a "Sherex-Koenig" plug which is a plug that is dropped into a drilled hole and then you take a punch and a BFH and wack the little steel ball that you can see. This drives the ball down into a taper bore in the plug which expands it and boy do they get tight!! I have seen them take 10,000 psi they are also a true MF to remove. Can't say I have ever seen one removed that didn't leave a real mess, any chance you could drill a new port next to the plug and use it. You might check the Sherex on the web but most of the info I have seen is only about the installation and not the removal.

Regarding your O ring at 450 psi it should be fine, I would suggest that you lube them well on assembly and maybe a little oil into the circuit on occasion. Be careful about adding a back up ring without checking that the groove is machined wide enough to accept the O ring and a backup. Check the Parker O ring catalog for dimensions. If the groove is not machined to accept an O ring and backup ring then if you put a backup ring in the narrow groove, and it will probably fit, you will find that the piston will probably not go into the bore and if it does (using the BFH for installation) you will probably shear rubber off of the O ring because the groove does  not have sufficient volume to allow the ring to compress when it is installed in the bore.

Rex
Rex

Not much matters and the rest doesn't matter at all.

Offline Jon

  • Sr. Member
  • ****
  • Posts: 852
Re: Australian Streamliner Bike Build
« Reply #581 on: January 07, 2013, 02:24:25 PM »
Thanks Guys.

I'll check them out thanks Grumm.

I definitely hadn't thought of that Tom and I had been trying to think of a non CO2 method.
I think I will go with CO2 now though as it will let me make a smaller main gear shifter which was going to be electric solenoid.
My skid retraction may become CO2 too now.

The groove is pretty wide Rex, I'll do some measuring and asking today, which would be better an O ring with backup or the square X ring that Grumm mentioned?
I don't mind modifying the groove or making new pistons if needed.


The little ball had a different name here last night, I can't put on here what it was called.
I spent a fair while trying to dive down the sides of it with a dremel and eventually noticed the material wasn't coming out like cast aluminium.
I got a punch a used the BFH method, the ball is in an drop in aluminium pocket and punched straight out the back of that to where it just rolled out the gallery.
Then just used a drill to an sneak the rest of the slip in pocket out.
I haven't tapped the hole yet until I decide on a fitting size, that will be driven by the control solenoids and main shifter ports so I don't end up with different sizes.

Cheers
jon
Underhouse Engineering
Luck = Opportunity + Preparation^3

Offline Jon

  • Sr. Member
  • ****
  • Posts: 852
Re: Australian Streamliner Bike Build
« Reply #582 on: January 08, 2013, 03:49:31 AM »
A bit shorter today:


Going to be a bit of work getting it inside the original chain line width with the rear wheel flipped over.

Sketched up some endplates:


And outboard bearing plates:


Cheers
jon
Underhouse Engineering
Luck = Opportunity + Preparation^3

Offline maj

  • Sr. Member
  • ****
  • Posts: 743
Re: Australian Streamliner Bike Build
« Reply #583 on: January 08, 2013, 05:24:17 AM »
Thats working out better than expected, be easy to fit in the chain line of the std busa wheel at that width

Offline Jon

  • Sr. Member
  • ****
  • Posts: 852
Re: Australian Streamliner Bike Build
« Reply #584 on: January 11, 2013, 04:03:47 AM »
I bought a burnt/written of Gen2 Hayabusa on eBay before Christmas.
Since then I've been trying to work out wether I scored a slightly singed Suzuki or wether the only thing more badly burnt than the Busa was me.

Got it home today and still wasn't convinced either way at first look:


Underhouse Engineering
Luck = Opportunity + Preparation^3